Showing posts with label Blogging events. Show all posts

Monday, May 5, 2008

Caramel Pecan Coconut Banana

While browsing through blogs I noticed a Banana Bread bake off blogging event hosted by Not Quite Nigella and decided that I just had to participate in this event. I love banana bread and love my tried-and-true recipe, but I felt the urge to be a little creative this time around. I started with my usual banana bread recipe as the base added some toasted pecans, toasted coconut and caramel bits.


Unfortunately the caramel bits sunk to the bottom of the loaf and made the bottom of my bread look overcooked (booo), so I would suggest coating them in flour before adding to the batter to keep them from falling. This bread turned out pretty good and has the potential to be better if the caramel would have behaved and stayed in place. Although the flavor of the coconut did not really come through you could definitely tell it was there from the little crunch it gave off.


Caramel Pecan Coconut Banana Bread
Source: Amber's Delectable Delights

Ingredients
3 bananas, smashed
1/4 cup butter, softened
2 tablespoons lemon juice
1 egg
1 1/2 cups flour
3/4 cup sugar
1 teaspoon baking powder
1/4 teaspoon salt
3/4 teaspoon baking soda
1/2 cup toasted pecans
1/3 cup toasted coconut
1/3 cup Kraft
caramel bits

Directions
Preheat oven to 350 degrees.
Combine all ingredients except for pecans, coconut and caramel bits using a mixer.
Add pecans, coconut and caramel bits and mix by hand until just mixed.
Grease loaf pan
Cook for 50 minutes at 350 degrees
Check with toothpick for doneness (may need to cook longer, possibly 15 more minutes)

Saturday, April 26, 2008

Tools of the Trade


Joelen over at Joelen's Culinary Adventures is hosting the second round of her new blogging event, Tasty Tools. I felt horrible that I did not get an entry out for the first one so I was determined to submit an entry to this one. As soon as I heard that this months tasty tool was scoops I knew what I wanted to make. Something using my mini muffin pan and my small scoop.

Today I had a random urge to make muffins,but I was craving savory ones not typical sweet ones. I found a basic muffin recipe that I could put my own spin on and went with it. Once I mixed up the batter I separated half of it into another bowl and decided to make one bowl cheddar dill and the other Parmesan rosemary.


Be sure to check out Joelen's blog on Monday May 5th for the round up of all the great recipes to bring your scoops out of retirement.

Muffins
(Adapted from Better Homes & Gardens, New Cook Book, Limited Breast Cancer Edition)

Ingredients
1 3/4 cups AP flour
1/3 cup sugar (If making savory flavored muffins reduce to 1/4 cup)
2 teaspoons baking powder
1/4 teaspoon salt
1 beaten egg
3/4 cup milk
1/4 cup cooking oil

Directions
1. Grease twelve 2 1/2" muffin cups or line with paper baking cups; set aside.
2. In a medium bowl combine flour, sugar, baking powder, and salt. Make a well in center of flour mixture; set aside.
3. In another bowl combine egg, milk, and oil. Add egg mixture all at once to flour mixture. Stir just until moistened (batter should be lumpy).
4. Scoop batter into prepared muffin cups, filling each two-thirds full. Bake in a 400 degree oven for 18 to 20 minutes or until golden and a wooden toothpick inserted in the center comes out clean. Cool in muffin cups on a wire rack for 5 minutes. Remove from muffin cups; serve warm.

Sizing up Muffins
Muffin cups come in all shapes and sized, from bite size minis to standard 2 1/2" cups to jumbo muffins. You'll need to adjust the baking time according to the pan you choose. Mini muffins will bake about about 8 minutes less than standard-size muffins. And for jumbo muffins, lower the oven temperature to 350 and bake about 30 minutes.


My Variations
Cheddar Dill Muffins
Prepare as above, except reduce the sugar to 1/4 cup and fold in 1 1/2 teaspoons dried dill and 1/4 cup sharp cheddar cheese, shredded.

Parmesan Rosemary Muffins
Prepare muffin recipe as above, except reduce the sugar to 1/4 cup and fold in 1 teaspoon rosemary (I used a pampered chef rosemary herb seasoning blend) and 1/4 cup freshly grated Parmesan cheese.

Wednesday, March 26, 2008

Seven Layers of Goodness

Nutriferia badge

It is kind of a tradition that every get together my family has my aunt makes a seven-layer salad. Ok let me rephrase that a little, she makes a big one for the family and a small one minus a few ingredients for my picky self. :) I get random cravings for this salad so I decided I better learn how to make the dressing myself. I searched around and found several variations of the recipe but ended up combining bits and pieces from each, throwing the ingredients together and tasting to see how it came out.


This salad is really versatile, you can add whatever ingredients you like and leave out those ones that make you cringe. :) Some other ingredients that I have seen in this salad are; onions, tomatoes, and hard boiled eggs. In my opinion the salad is all about the sweet creamy dressing and not that it has exactly seven layers.

On this particular salad I left the dressing off because I thought that I had made way to much and that my in-laws would never eat it all. Boy was I wrong, I guess I should have just put the dressing on to begin with. But I did all of the ingredients in half which was a wise decision, otherwise it would not have all fit into my pretty trifle bowl.


Seven Layer Salad
(Source: Amber's Delectable Delights)

Salad Ingredients
1 head lettuce or 3 bunches of romaine (chopped into bite size pieces)
3/4 cup carrots, cut into bite size pieces
3/4 cup broccoli, cut into bite size pieces
3/4 cup cauliflower, cut into bite size pieces
1/3 cup bacon, cooked and crumbled
1 cup of your favorite shredded cheese
1/2 cup peas
1/4 cup parmesan cheese

Dressing Ingredients
1 1/2 cups miracle whip (or mayo)
1 tsp white vinegar
1/4 cup milk
1/4 cup sugar
1 tsp garlic powder
dash onion powder
dash pepper

Directions
1) Combine all dressing ingredients and set aside.
2) In a 9x13 dish layer the ingredients, 90% of the lettuce, carrots, broccoli and cauliflower, light layer of dressing, remaining 10% of lettuce, remaining dressing, shredded cheese, peas, bacon and parmesan cheese.
3) Cover salad and put into refrigerator a few hours before serving.

Sunday, March 2, 2008

So Happy Together

Elly over at Elly Says Opa! has started a new blogging event called "Eat to the Beat!". All that she requires is that you make some kind of food, whether it be sweet or savory, and somehow tie it to a song. I knew that I wanted to submit an entry to the event but had no clue what song to pick or what to make. I finally decided to turn my train of thought around and make something and then frantically search for a song to tie to it. I know I know, how sad it that! I made this cheesecake for my bosses birthday because he loves cheesecake and is always talking about a turtle one and how amazing it is. We have not tried it yet but I will be sure to come back and tell you just how wonderful it really is. **Update, Ok WOW, this stuff is amazing! I used a chocolate graham cracker crust instead of an oreo one and I also just drizzled the toppings on instead of doing it the way the recipe called for. This is a light tasting cheesecake, it is not really heavy and dense like so many other baked cheesecakes I have had before. So creamy and so good!

"Me and you and you and me
No matter how they toss the dice
It had to be
The only one for me is you
and you for me
So happy together"


I can not take the credit for choosing the song to go with this cheesecake. I have to throw all the props to Chelle over at Sugar and Spice for helping me. The song that she suggested to me was “So Happy Together" by the Turtles. What a perfect song! After all this is a turtle cheesecake and the combination of cream cheese, caramel, chocolate and pecans make her and me and so many other people, happy. :)


Jake's Explosive Turtle Cheesecake
(Source: FoodNetwork.com)

Ingredients
1 1/4 cups chocolate cookie crumbs (recommended: Oreo)
1 cup sugar, plus 4 tablespoons
4 tablespoons unsalted butter, melted, plus 3 tablespoons
2 1/2 pounds cream cheese, softened to room temperature
1 1/2 teaspoons vanilla extract
2 tablespoons all purpose flour
1 cup semisweet chocolate chips, plus 1 cup melted
1 cup sour cream
4 eggs
1 cup semisweet chocolate chips, for topping
1 cup caramel, for topping
1 cup pecans, for topping

Directions
Preheat oven to 325 degrees F.

Lightly grease the bottom and side of a 9-inch springform pan. In a medium sized mixing bowl, combine the cookie crumbs, 4 tablespoons of sugar, and the melted butter and mix together well. Pour the crumbs into the bottom of the pan and press them out evenly. Once completed, set aside.

In a large mixing bowl, combine cream cheese, the rest of the sugar, and vanilla. Beat together until light and creamy. Add the flour and blend until smooth. With the first cup of chocolate chips, fold into filling. Pour in a melted cup of the chocolate chips and sour cream and mix well. Add the eggs, 1 at a time, mixing each at low speed. Pour the filling into prepared pan, bake for 50 minutes to 1 hour, until the center is almost set. Let cake cool for 10 minutes, then run a knife around the sides and remove rim of the pan. Refrigerate for 8 hours or overnight.

In a small saucepan, melt 3 tablespoons of butter and pour in chocolate chips. Mix together on medium-low heat. Once chocolate and butter is combined, pour warm mixture onto chilled cake. Refrigerate for 10 to 15 minutes. In another small saucepan, pour in caramel and chopped pecans, bring to a boil. Let mixture boil for another 2 minutes, stirring constantly. Let mixture cool for 3 to 5 minutes, and pour onto cake. Serve immediately or refrigerate until ready to serve.

Sometimes You Just Have to...

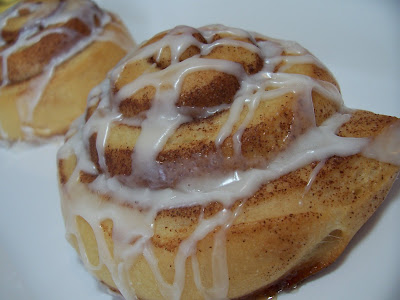
give in to those cravings. Lately I have had quite the craving for cinnamon rolls but have not made them because my husband claims that he does not like cinnamon (even though he admitted to enjoying one of these this morning).
Today was no ordinary day at my house, my friend Joelen from Joelen's Culinary Adventures was coming into town and I wanted to make us a delicious breakfast. I figured this would be a great excuse to finally make cinnamon rolls. These were excellent and I am so glad I was able to finally make them.


I am submitting this blog entry to a brand new blogging event called Master Baker. Once a month a single ingredient will be chosen and all that anyone that wants to participate has to do is bake something with the chosen ingredient. Sounds easy enough for me.
Check out the Master Baker Blog in a few days for a round up of all the wonderful cinnamon filled entries.


Cinnamon Buns and Sticky Buns
Source: Peter Reinhart´s The Bread Baker´s Apprentice

Days to Make: 1
15 minutes mixing; 3 1/2 hours fermentation, shaping and proofing; 20 to 40 minutes baking.
Yield: Makes 8 to 12 large or 12 to 16 smaller cinnamon or sticky buns

Ingredients
6 1/2 tablespoons (3.25 ounces) granulated sugar
1 teaspoon salt
5 1/2 tablespoons (2.75 ounces) shortening or unsalted butter or margarine
1 large egg, slightly beaten
1 teaspoon lemon extract OR 1 teaspoon grated zest of 1 lemon
3 1/2 cups (16 ounces) unbleached bread or all-purpose flour2 teaspoons instant yeast
*1 1/8 to 1 1/4 cups whole milk or buttermilk, at room temperature OR 3 tablespoons powdered milk (DMS) and 1 cup water
1/2 cup cinnamon sugar (6 1/2 tablespoons granulated sugar plus 1 1/2 teaspoons ground cinnamon, or any other spices you want to use, cardamom, ginger, allspice, etc.)
- White fondant glaze for cinnamon buns or caramel glaze for sticky buns (at the end of the recipe.)
- Walnuts, pecans, or other nuts (for sticky buns.)Raisins or other dried fruit, such as dried cranberries or dried cherries (for sticky buns, optional.)
*Instant yeast contains about 25% more living cells per spoonful than active dry yeast, regardless of the brand. Instant yeast is also called rapid-rise or fast-rising.

Directions
1. Cream together the sugar, salt, and shortening or butter on medium-high speed in an electric mixer with a paddle attachment (or use a large metal spoon and mixing bowl and do it by hand); if you are using powdered milk, cream the milk with the sugar, and add the water with the flour and yeast. Whip in the egg and lemon extract/zest until smooth. Then add the flour, yeast, and milk. Mix on low speed (or stir by hand) until the dough forms a ball. Switch to the dough hook and increase the speed to medium, mixing for approximately 10 minutes (or knead by hand for 12 to 15 minutes), or until the dough is silky and supple, tacky but not sticky. You may have to add a little flour or water while mixing to achieve this texture. Lightly oil a large bowl and transfer the dough to the bowl, rolling it around to coat it with oil. Cover the bowl with plastic wrap.

2. Ferment at room temperature for approximately 2 hours, or until the dough doubles in size.

3. Mist the counter with spray oil and transfer the dough to the counter. Proceed as shown in the photo on the left for shaping the buns.
Transcription: (A) Roll out the dough with a rolling pin, lightly dusting the top with flour to keep it from sticking to the pin. Roll it into a rectangle about 2/3 inch thick and 14 inches wide by 12 inches long for larger buns, or 18 inches wide by 9 inches long for smaller buns. Don´t roll out the dough too thin, or the finished buns will be tough and chewy rather than soft and plump. (B)Sprinkle the cinnamon sugar over the surface of the dough and (C) roll the dough up into a cigar-shaped log, creating a cinnamon-sugar spiral as you roll. With the seam side down, cut the dough into 8 to 12 pieces each about 1 3/4 inches thick for larger buns, or 12 to 16 pieces each 1 1/4 inch thick for smaller buns.)

4. For cinnamon buns, line 1 or more sheet pans with baking parchment. Place the buns approximately 1/2 inch apart so that they aren´t touching but are close to one another.

For sticky buns, coat the bottom of 1 or more baking dishes or baking pans with sides at least 1 1/2 inches high with a 1/4 inch layer of the caramel glaze. Sprinkle on the nuts and raisins (if you are using raisins or dried fruit.) You do not need a lot of nuts and raisins, only a sprinkling. Lay the pieces of dough on top of the caramel glaze, spacing them about 1/2 inch apart. Mist the dough with spray oil and cover loosely with plastic wrap or a food-grade plastic bag.

5. Proof at room temperature for 75 to 90 minutes, or until the pieces have grown into one another and have nearly doubled in size. You may also retard the shaped buns in the refrigerator for up to 2 days, pulling the pans out of the refrigerator 3 to 4 hours before baking to allow the dough to proof.

6. Preheat the oven to 350°F (175°C) with the oven rack in the middle shelf for cinnamon buns but on the lowest shelf for sticky buns.

7. Bake the cinnamon buns for 20 to 30 minutes or the sticky buns 30 to 40 minutes, or until golden brown. If you are baking sticky buns, remember that they are really upside down (regular cinnamon buns are baked right side up), so the heat has to penetrate through the pan and into the glaze to caramelize it. The tops will become the bottoms, so they may appear dark and done, but the real key is whether the underside is fully baked. It takes practice to know just when to pull the buns out of the oven.

8. For cinnamon buns, cool the buns in the pan for about 10 minutes and then streak white fondant glaze across the tops, while the buns are warm but not too hot. Remove the buns from the pans and place them on a cooling rack. Wait for at least 20 minutes before serving. For the sticky buns, cool the buns in the pan for 5 to 10 minutes and then remove them by flipping them over into another pan. Carefully scoop any run-off glaze back over the buns with a spatula. Wait at least 20 minutes before serving.

White fondant glaze for cinnamon buns
Cinnamon buns are usually topped with a thick white glaze called fondant. There are many ways to make fondant glaze, but here is a delicious and simple version, enlivened by the addition of citrus flavor, either lemon or orange. You can also substitute vanilla extract or rum extract, or simply make the glaze without any flavorings.
Sift 4 cups of powdered sugar into a bowl. Add 1 teaspoon of lemon or orange extract and 6 tablespoons to 1/2 cup of warm milk, briskly whisking until all the sugar is dissolved. Add the milk slowly and only as much as is needed to make a thick, smooth paste.
When the buns have cooled but are still warm, streak the glaze over them by dipping the tines of a fork or a whisk into the glaze and waving the fork or whisk over the tops. Or, form the streaks by dipping your fingers in the glaze and letting it drip off as you wave them over the tops of the buns. (Remember to wear latex gloves.)

Caramel glaze for sticky buns
Caramel glaze is essentially some combination of sugar and fat, cooked until it caramelizes. The trick is catching it just when the sugar melts and lightly caramelizes to a golden amber. Then it will cool to a soft, creamy caramel. If you wait too long and the glaze turns dark brown, it will cool to a hard, crack-your-teeth consistency. Most sticky bun glazes contain other ingredients to influence flavor and texture, such as corn syrup to keep the sugar from crystallizing and flavor extracts or oils, such as vanilla or lemon. This version makes the best sticky bun glaze of any I´ve tried. It was developed by my wife, Susan, for Brother Juniper´s Cafe in Forestville, California.NOTE: you can substitute the corn syrup for any neutral flavor syrup, like cane syrup or gold syrup.
1. In the bowl of an electric mixer, combine 1/2 cup granulated sugar, 1/2 cup firmly packed brown sugar, 1/2 teaspoon salt, and 1/2 pound unsalted butter, at room temperature.
2. Cream together for 2 minutes on high speed with the paddle attachment. Add 1/2 cup corn syrup and 1 teaspoon lemon, orange or vanilla extract. Continue to cream for about 5 minutes, or until light and fluffy.3. Use as much of this as you need to cover the bottom of the pan with a 1/4-inch layer. Refrigerate and save any excess for future use; it will keep for months in a sealed container.

Tuesday, February 5, 2008

Fabulous Focaccia

I decided to add this fabulous focaccia to Bread Baking Day #7 hosted by Chili und Ciabatta. Check out all the wonderful entries by clicking here.


I received Peter Reinharts, The Bread Baker's Appretince book for my birthday last year but always forgot to look through it when I wanted to make bread. Once I finally remembered to look through it I realized that 99% of the recipes took more than a day to make. So I would actually have to plan to make them instead of doing it spur of the moment like I usually would. Focaccia bread sounded pretty good so I found the recipe and made it this weekend.


The dough was a sticky mess but since I did not have to knead it by hand it was not anything to painful to work with. This recipe came together very easy, the hardest part of the whole thing was waiting and waiting some more. This bread turned out amazing and I can't wait to make some turkey sandwiches with it.


Focaccia Bread
(Source: The Bread Baker's Apprentice, By Peter Reinhart)

Makes one 17 by 12-inch focaccia
Days to make: 2


Ingredients:
5 cups (22.5 oz) unbleached high-gluten or bread flour
2 teaspoons (.5 oz) salt
2 teaspoons (.22 oz) instant yeast
6 tablespoons (3 oz) olive oil
2 cups (16 oz) water, at room temperature
1/4 to 1/2 cup Herb oil (recipe below)

Directions:
1. Stir together the flour, salt, and yeast in a large mixing bowl (or in the bowl of an electric mixer). Add the oil and water and mix with a large metal spoon until all the ingredients form a wet, sticky ball (or mix on low speed with the paddle attachment). If you are mixing by hand, repeatedly dip one of your hands or the metal spoon into cold water and use it, much like a dough hook, to work the dough vigorously into a smooth mass while rotating the bowl in a circular motion with the other hand. Reverse the circular motion a few times to develop the gluten further. Do this for 3 to 5 minutes, or until the dough is smooth and the ingredients are evenly distributed. If you are using an electric mixer, switch to the dough hook and mix on medium speed for 5 to 7 minutes, or as long as it takes to create a smooth, sticky dough. The dough should clear the sides of the bowl but stick to the bottom of the bowl. You may need to add additional flour to firm up the dough enough to clear the sides of the bowl, but the dough should still be quite soft and sticky.
2. Sprinkle enough flour on the counter to make a bed about 6 inches square. Using a scraper or spatula dipped in water, transfer the sticky dough to the bed of flour and dust liberally with flour, patting the dough into a rectangle. Wait 5 minutes for the dough to relax.
3. Coat your hands with flour and stretch the dough from each end to twice its size. Fold it, letter style, over itself to return it to a rectangular shape. Mist the top of the dough with spray oil, again dust with flour, and loosely cover with plastic wrap.
4. Let rest for 30 minutes. Stretch and fold the dough again; mist with spray oil, dust with flour, and cover. After 30 minutes, repeat this one more time.
5. Allow the covered dough to ferment on the counter for 1 hour it should swell but necessarily double in size.
6. Line a 17 by 12-inch sheet pan with baking parchment and proceed with the shaping and panning instructions below.
7. Loosely cover the pan with plastic wrap (or place the pan inside a food-grade plastic bag). Refrigerate the dough overnight (or for up to 3 days.)
8. Remove the pan from the refrigerator 3 hours before baking. Drizzle additional herb oil over the surface and dimple it in. (You can use all of it if you want; the dough will absorb it even though it looks like a lot.) This should allow you to fill the pan completely with the dough a thickness of about 1/2 inch. Add any other pre-proof toppings desired. Again, cover the pan with plastic and proof the dough at room temperature for 3 hours, or until the dough doubles in size, rising to a thickness of nearly 1 inch.
9. Preheat the oven to 500*F with the oven rack on the middle shelf. Gently place any pre-bake toppings on the dough.
10. Place the pan in the oven. Lower the oven setting to 450*F and bake for 10 minutes. Rotate the pan 180 degrees and continue baking the focaccia for 5 to 10 minutes, or until it begins to turn a light golden brown. If you are using and during baking toppings, sprinkle them on at this point and continue baking an additional 5 minutes or so. The internal temperature of the dough should register above 200*F (measured in the center), and the cheese, if using, should melt but not burn.
11. Remove the pan from the oven and immediately transfer the focaccia out of the pan onto a cooling rack. If the parchment is stuck on the botoom, carefully remove it by lifting the corner of the focaccia and peeling it off the bottom with a gentle tug.
12. Allow the fococcia to cool for at least 20 minutes before slicing and serving.

Shaping Focaccia
A. Drizzle 1/4 cup of olive oil over the paper, and spread it with your hands or brush to cover the surface. Lightly oil your hands and, using a plastic or metal pastry scraper, lift the dough off of the counter and transfer it to the sheet pan, maintaining the rectangular shape as much as possible.
B. Spoon half of the herb oil over the dough.
C. Use your fingertips to dimple the dough and spread it to fill the pan simultaneously. Do not use the flat of your hands - only the fingertips- to avoid tearing or ripping the dough. Try to keep the thickness as uniform as possible across the surface. Dimpling allows you to degas only part of the dough while preserving gas in the nondimpled sections. If the dough becomes to springey, let it rest for about 15 minutes and then continue dimpling. Don't worry if you are unable to fill the pan 100 percent, especially the corners. As the dough relaxes and proofs, it will spread out naturally. Use more herb oil as needed to ensure that the entire surface is coated with oil.


Herb Oil
- The generous application of herb oil to focaccia will enhance the flavor of the dough more than any toppings. There are many ways to make this oil, and you can make it in any quantity. You can either use dry or fresh herbs, or a combination. Do not heat the oil, just warm it, and then let the herbs steep in the warm oil, infusing it with their wonderful flavors.
- Here is one way to make it, but feel free to substitute your favorite herbs and spices. The olive oil you use does not have to be extra virgin because it will be cooked later, and the subtle flavor of extra virgin, for which you pay so much, will be lost.

Warm 2 cups of oil to about 100*F. Add 1 cup chopped fresh herbs. The herbs may include basil, parsley, oregano, tarragon, rosemary, thyme, cilantro, savory, and sage, in any combination. (Substitue 1/3 cup dried herbs or a blend such as herbs de Provence, or use a combination of fresh and dried herbs.) Add 1 tablespoon coarse or kosher salt, 1 teaspoon coarsely ground black pepper, and 1 tablespoon granulated garlic or 5 - 6 cloves fresh garlic chopped or pressed. You may also add 1 teaspoon paprika, 1 teaspoon ground cayenne pepper, 1 tablespoon fennel seeds, 1 teaspoon onion powder, or 1 tablespoon dried minced onions. Store any leftover herb oil in the refrigerator for up to 2 weeks.

Friday, December 28, 2007

Best of 2007


I was invited to join in the fun for the Best of 2007, Fooblogger's recipe collection. After wondering which recipe I would choose I decided to submit the recipe for Sweet Dinner Rolls that I blogged about back in September.

To visit the sweet dinner roll recipe, please click here.

Why do you ask that I selected this recipe? It is simple. First of all I am a lover of bread, the aroma while it is baking is enough to drive a person crazy. The taste of fresh out of the oven buttered bread is amazing. And the satisfaction of successfully making yeast breads makes me extremely happy and giddy. Another reason why I chose this recipe is because my family loved them at Thanksgiving and was sad when I did not bring them to Christmas. And they were also a hit when I made them for my husband's work Christmas party. Fellow bloggers also agreed that they were amazing. Chelley at Sugar and Spice, Renea at sweet-savory-southern and Erika at Bean's Bistro were also pleased with the results of the moist sweet deliciousness these rolls provided.


Wishing all of my readers a happy, healthy and prosperous 2008!!

Monday, November 26, 2007

Daring bread

I have been eyeing all the wonderful things that the Daring Bakers have been making for months. I thought that it would be a great opportunity for me to be challenged in the kitchen and learn some new techniques. So, I decided I could not wait any longer and had to join. This is my first challenge and I was so excited to see that it was bread.


Now on to the recipe. I did not really stray far from the recipe because the original sounded so good. I ended up using 4 small and 1 medium russet burbank potatoes because the ones in my bag were surprisingly small, and I had exactly 3 cups of the cooking water to add back into the mashed potatoes. Who knew potatoes took so much time to get to room temperature, I think mine took 1.5 to 2 hours just to get down to the correct temperature. And my dough did not take all 8 cups of the flour either.

My foccocia was brushed with garlic olive oil and sprinkled with coarse salt and a rosemary seasoning mix that consisted of rosemary, lemon peel and garlic. This did bake for more than 10 minutes. For the loaf I just did a regular traditional loaf. The fun with this when when I found out what a soft dough really is. :) For all of you that do not know, usually when you make bread dough it can withstand to be picked up and transferred to a loaf pan without any problems. Well with this particular loaf if you try to pick it up you will find that gravity just pulls the dough right back to the counter. Fun times!


This months host is Tanna from My Kitchen in Half Cups

Tender Potato Bread
(From Home Baking: The Artful Mix of Flour & Tradition Around the World by Jeffrey Alford and Naomi Duguid; who also wrote Hot Sour Salty Sweet)

Challenge Recipe:
Metric measurements are from the European edition. Thank you Linda (Linda.kovacevic.nl) from Make Life Sweeter

Ingredients
:
4 medium to large floury (baking) potatoes, peeled and cut into chunks.
Tanna Note: For the beginner bread baker I suggest no more than 8 ounces of potato; for the more advanced no more than 16 ounces. The variety of potatoes you might want to use would include Idaho, Russet & Yukon gold, there are others.

4 cups(950 ml) water, reserve cooking water
1 tablespoon plus 1 teaspoon salt
2 teaspoons active dry yeast
6 ½ cups to 8 ½ cups (1 kg to 1350g) unbleached all-purpose
1 tablespoon unsalted butter, softened
1 cup (130g) whole wheat flour

Making the Dough
(Directions will be for making by hand):

Put the potatoes and 4 cups water in a sauce pan and bring to boil. Add 1 teaspoon salt and cook, half covered, until the potatoes are very tender.

Drain the potatoes, SAVE THE POTATO WATER, and mash the potatoes well. Tanna Note: I have a food mill I will run my potatoes through to mash them.

Measure out 3 cups(750ml) of the reserved potato water. Add extra water if needed to make 3 cups. Place the water and mashed potatoes in the bowl you plan to mix the bread dough in. Let cool to lukewarm (70-80°F/21 - 29°C) – stir well before testing the temperature – it should feel barely warm to your hand. You should be able to submerge you hand in the mix and not be uncomfortable.

Add yeast to 2 cups all-purpose flour and whisk. Add yeast and flour to the cooled mashed potatoes & water and mix well. Allow to rest/sit 5 minutes.

Note about Adding Yeast: If using Active Dry Yeast or Fresh yeast, mix & stir yeast into cooled water and mashed potatoes & water and let stand 5 minutes. Then add 2 cups of flour to the yeast mix and allow to rest several minutes. If using Instant Dry Yeast, add yeast to 2 cups all-purpose flour and whisk. Add yeast and flour to the cooled mashed potatoes & water and mix well. Allow to rest/sit 5 minutes.

Sprinkle in the remaining 1 tablespoon salt and the softened butter; mix well. Add the 1 cup whole wheat flour, stir briefly.

Add 2 cups of the unbleached all-purpose flour and stir until all the flour has been incorporated.Tanna Note: At this point you have used 4 cups of the possible 8 ½ cups suggested by the recipe.

Turn the dough out onto a generously floured surface and knead for about 10 minutes, incorporating flour as needed to prevent sticking. The dough will be very sticky to begin with, but as it takes up more flour from the kneading surface, it will become easier to handle; use a dough scraper to keep your surface clean. The kneaded dough will still be very soft. Place the dough in a large clean bowl or your rising container of choice, cover with plastic wrap or lid, and let rise about 2 hours or until doubled in volume.

Turn the dough out onto a well-floured surface and knead gently several minutes. It will be moist and a little sticky.

Forming the Bread
:
Tanna Note: It is at this point you are requested to Unleash the Daring Baker within. The following is as the recipe is written. You are now free to follow as written or push it to a new level.

Divide the dough into 2 unequal pieces in a proportion of one-third and two-thirds (one will be twice as large as the other). Place the smaller piece to one side and cover loosely.

To shape the large loaf:
Butter a 9 x 5 x 2.5 inch loaf/bread pan. Flatten the larger piece of dough on the floured surface to an approximate 12 x 8 inch oval, then roll it up from a narrow end to form a loaf. Pinch the seam closed and gently place seam side down in the buttered pan. The dough should come about three-quarters of the way up the sides of the pan. Cover with plastic wrap and let rise for 35 to 45 minutes, until puffy and almost doubled in volume.

To make a small loaf with the remainder:
Butter an 8x4X2 inch bread pan. Shape and proof the loaf the same way as the large loaf.

To make rolls:
Butter a 13 x 9 inch sheet cake pan or a shallow cake pan. Cut the dough into 12 equal pieces. Shape each into a ball under the palm of your floured hand and place on the baking sheet, leaving 1/2 inch between the balls. Cover with plastic wrap and let rise for about 35 minutes, until puffy and almost doubled.

To make focaccia:
Flatten out the dough to a rectangle about 10 x 15 inches with your palms and fingertips. Tear off a piece of parchment paper or wax paper a little longer than the dough and dust it generously with flour. Transfer the focaccia to the paper. Brush the top of the dough generously with olive oil, sprinkle on a little coarse sea salt, as well as some rosemary leaves, if you wish and then finally dimple all over with your fingertips. Cover with plastic and let rise for 20 minutes.

Baking the bread(s):
Note about baking order: bake the flat-bread before you bake the loaf; bake the rolls at the same time as the loaf.

Note about Baking Temps: I believe that 450°F(230°C) is going to prove to be too hot for the either the large or small loaf of bread for the entire 40/50 minutes. I am going to put the loaves in at 450°(230°C) for 10 minutes and then turn the oven down to 375°F (190 °C) for the remaining time.

Note about cooling times: Let all the breads cool on a rack for at least 30 minutes before slicing. Rolls can be served warm or at room temperature.

For loaves and rolls:
Dust risen loaves and rolls with a little all-purpose flour or lightly brush the tops with a little melted butter or olive oil (the butter will give a golden/browned crust). Slash loaves crosswise two or three times with a razor blade or very sharp knife and immediately place on the stone, tiles or baking sheet in the oven. Place the rolls next to the loaf in the oven.

Bake rolls until golden, about 30 minutes. Bake the small loaf for about 40 minutes. Bake the large loaf for about 50 minutes.

Transfer the rolls to a rack when done to cool. When the loaf or loaves have baked for the specified time, remove from the pans and place back on the stone, tiles or baking sheet for another 5 to 10 minutes. The corners should be firm when pinched and the bread should sound hollow when tapped on the bottom.

For foccaia:
Place a baking stone or unglazed quarry tiles, if you have them, if not use a no edged baking/sheet (you want to be able to slide the shaped dough on the parchment paper onto the stone or baking sheet and an edge complicates things). Place the stone or cookie sheet on a rack in the center of the oven and preheat to 450°F/230°C.

If making foccacia, just before baking, dimple the bread all over again with your fingertips. Leaving it on the paper, transfer to the hot baking stone, tiles or baking sheet. Bake until golden, about 10 minutes. Transfer to a rack (remove paper) and let cool at least 10 minutes before serving.


Visit the Daring Bakers blogroll to see how all of the other ladies bread turned out.

Tuesday, October 16, 2007

Happy World Day of Bread

Today (October 16, 2007) Is "World Day of Bread". I found a blogging event hosted by Zorra that celebrated it and decided that I needed to join in. Afterall, I was due to bake some more bread anyway.

And since I can not leave recipes alone I decided to make a pepperoni and cheese version too. I do have my reasons for trying that though. There is a local Butcher Block / Deli called Charlies and they sell pepperoni and cheese bread. I remember that it used to be very good and I would love eating it. But the last time I had it the pepperoni and cheese were so greasy the the entire middle of the loaf fell and there was a huge hole in the middle. So I tried to make it myself to see if I could conquer the falling center. Mission accomplished! Although I used way less cheese and pepperoni than they did. But I do agree that I should have added a bit more. Next time, I will.

The taste of this bread is excellent, it has a nice crispy crust and a nice soft center. I think that my bread did not rise as much as it should have because it is wide and flat instead of being tall, but it was still fantastic.


Italian Bread
(Found on Sugar & Spice Via The Fresh Loaf)

Makes 2 large 2-pound loaves

Preferment:
1 cup water
1 cup bread or all-purpose unbleached flour
1/2 teaspoon instant yeast

Dough:
All of the preferment
5 cups bread or all-purpose unbleached flour
1/2 cup nonfat dry milk
1 tablespoon malt syrup, malt powder, brown sugar, or sugar
1 tablespoon salt
2 teaspoons instant yeast
1 tablespoon olive oil
2 cups water

Preparation:
To start the preferment, mix together the flour, water, and yeast in a small bowl and cover with plastic wrap. Leave out at room temperature for at least 4 hours and as long as 16 hours.

To make the dough, mix together the preferment, water, olive oil, yeast, salt, malt powder, and dry milk in a bowl with 2 more cups of flour. Mix thoroughly. Mix or knead in in the rest of the flour a half a cup at a time until you have a slack dough but one that is no longer sticky. Total mixing time should be in the ballpark of 10 to 15 minutes.

Place the dough in a well-greased bowl and cover with plastic wrap. Allow to rise at room temperature until at least 2 times in size, approximately 2 hours. Punch the dough down and let it rise again for half an hour.

Remove the dough from the bowl and divide it in half. Shape the dough into a ball or log, cover with a damp towel, and allow it to relax for another 20 minutes.

Shape the dough into its final shape. Cover again and allow to rise for another hour until doubled in bulk.

Meanwhile, preheat the oven and baking stone, if you are using one, to 425 degrees.

Right before placing the loaves in the oven brush or spray them lightly with water. Place them into the oven and bake for 20 minutes before rotating them. Bake them another 20 to 30 minutes or until the internal temperature of the loaf reads 200 degrees. Remove from the oven and allow to cool for at least a half an hour before serving.


Wednesday, June 20, 2007

Third time is a charm

I have been tagged 3 times now. First was by Kate over at Little White Lies, then Carrie over at Carries Cooking Adventures, and finally by The Cooking Fiend over at Smells Like Home. I guess that means that people want to know about me and I need to play along. So here goes nothing.

First, the rules.
Each player starts with seven random facts or habits about himself or herself. A tagged player then writes a blog entry with the seven things, as well as these rules. Then the player tags seven others and lists their names on his or her blog. Remember to leave a comment for your newly tagged players, letting them know they have been tagged and to read your blog!

Second, my random facts/habits. And since this is a food blog I will stick with the topic and provide food related facts/habits.
1) The only reason why I buy bananas is to let them go bad so I can bake with them. The texture of a banana is not something that I enjoy. I could eat a bite or two but that is enough for me. But I love banana bread and muffins.

2) I love cheese, but I prefer white cheese over other colored cheese. Isn't that weird? Yeah, I think so too. If I order a sandwich I tell them white cheese (doesn't matter what kind as long as it's white) If I were eating off of a cheese tray I would eat orange cheese, but it would not be the first thing I picked up.

3) I would pick salty over sweet any day. Do not get me wrong, I enjoy the occasional chocolate treat but I love the crunch that a salty snack brings.

4) I do not like onions and I avoid them at all costs. They literally make me gag. But I do use onion powder in my cooking. And I could eat Funyuns all day long. Yes, I know I am weird.

5) I absolutely love Pampered Chef products. Some people say they are overpriced and can buy the same products at Bed Bath & Beyond cheaper. But I would much rather support someones small business than go to a chain store. Their products are wonderful and I have never purchased something from them that I did not like. And I live by their stones. IMO everything tastes better when baked/cooked on a stone. :)

6) I once dropped an entire glass pan of cooked lasagna on the floor. I was so upset about and to this day I still get teased about it.

7) And the most embarrassing one last... When I was little I used to store food inside my cheeks. My cheeks stuck out so far that my parents would call me a chipmunk. I do not know why I did it, but I just did. :)

And I am going to be tagging the following 7 people -
- Jessica at Adventures in the Kitchen
- Annie at Annie's Eats
- Wedbliss5 at Nothing But Crumbs
- MaryEllen at Mary Ellen's Cooking Creations
- IAM4UK at What's for Dinner?
- Candice at Candice's Culinary Creations