Showing posts with label Dessert - Cakes. Show all posts

Monday, May 23, 2011

Strawberry Cream Cake


I was searching around for a white cake recipe for my Dad's birthday when I came across this recipe on Cook's Illustrated website.  The idea of the whole thing just sounded mind blowing.  I mean who would not love a giant size gourmet strawberry shortcake with a cream cheese whipped cream topping.  Heck, the whipped cream recipe alone won me over.  This cake is so light and fluffy that it is great for the warmer months when you just don't want to eat anything that will make you feel like you ate a brick.  Light, fluffy, and fantastic -  A must try dessert!  


Strawberry Cream Cake

Source: Cook's Illustrated

Cake

1 1/4 cups (5 ounces) cake flour
1 1/2 teaspoons baking powder
1/4 teaspoon table salt
1 cup (7 ounces) sugar 
5 large eggs (2 whole and 3 separated), room temperature
tablespoons unsalted butter , melted and cooled slightly
2 tablespoons water
2 teaspoons vanilla extract
Strawberry Filling
2 pounds fresh strawberries (about 2 quarts), washed, dried, and stemmed
4 - 6 tablespoons sugar
2 tablespoons Kirsch
pinch table salt
Whipped Cream
8 ounces cream cheese, room temperature
1/2 cup sugar (3 1/2 ounces)
1 teaspoon vanilla extract
1/8 teaspoon table salt
2 cups heavy cream

Instructions
 

FOR THE CAKE: Adjust oven rack to lower-middle position and heat oven to 325 degrees. Grease and flour round 9 by 2-inch cake pan or 9-inch springform pan and line with parchment paper. Whisk flour, baking powder, salt, and all but 3 tablespoons sugar in mixing bowl. Whisk in 2 whole eggs and 3 yolks (reserving whites), butter, water, and vanilla; whisk until smooth. In clean bowl of standing mixer fitted with whisk attachment, beat remaining 3 egg whites at medium-low speed until frothy, 1 to 2 minutes. With machine running, gradually add remaining 3 tablespoons sugar, increase speed to medium-high, and beat until soft peaks form, 60 to 90 seconds. Stir one-third of whites into batter to lighten; add remaining whites and gently fold into batter until no white streaks remain. Pour batter into prepared pan and bake until toothpick or wooden skewer inserted into center of cake comes out clean, 30 to 40 minutes. Cool in pan 10 minutes, then invert cake onto greased wire rack; peel off and discard parchment. Invert cake again; cool completely, about 2 hours.
FOR THE STRAWBERRY FILLING: Halve 24 of best-looking berries and reserve. Quarter remaining berries; toss with 4 to 6 tablespoons sugar (depending on sweetness of berries) in medium bowl and let sit 1 hour, stirring occasionally. Strain juices from berries and reserve (you should have about 1/2 cup). In workbowl of food processor fitted with metal blade, give macerated berries five 1-second pulses (you should have about 1 1/2 cups). In small saucepan over medium-high heat, simmer reserved juices and Kirsch until syrupy and reduced to about 3 tablespoons, 3 to 5 minutes. Pour reduced syrup over macerated berries, add pinch of salt, and toss to combine. Set aside until cake is cooled.
FOR THE WHIPPED CREAM: When cake has cooled, place cream cheese, sugar, vanilla, and salt in bowl of standing mixer fitted with whisk attachment. Whisk at medium-high speed until light and fluffy, 1 to 2 minutes, scraping down bowl with rubber spatula as needed. Reduce speed to low and add heavy cream in slow, steady stream; when almost fully combined, increase speed to medium-high and beat until mixture holds stiff peaks, 2 to 2 1/2 minutes more, scraping bowl as needed (you should have about 4 1/2 cups).
TO ASSEMBLE THE CAKE: Using large serrated knife, slice cake into three even layers. Place bottom layer on cardboard round or cake plate and arrange ring of 20 strawberry halves, cut sides down and stem ends facing out, around perimeter of cake layer. Pour one half of pureed berry mixture (about 3/4 cup) in center, then spread to cover any exposed cake. Gently spread about one-third of whipped cream (about 1 1/2 cups) over berry layer, leaving 1/2-inch border from edge. Place middle cake layer on top and press down gently (whipped cream layer should become flush with cake edge). Repeat with 20 additional strawberry halves, remaining berry mixture, and half of remaining whipped cream; gently press last cake layer on top. Spread remaining whipped cream over top; decorate with remaining cut strawberries. Serve, or chill for up to 4 hours.

Thursday, September 17, 2009

Vanilla Pound Cake

I was approached by representative at Singing Dog Vanilla and asked if I would like to test out one of their products. Since I am always interested in trying new products I took them up on their offer and asked for a sample of their vanilla extract. After receiving a bottle of organic vanilla extract in the mail I set out on a search to find the perfect recipe to use it in. I knew that in order to really taste the product I would have to make something that showcased vanilla as a flavoring. I found this pound cake recipe, which happened to call for 2 whole tablespoons of extract, and I knew I had found the perfect recipe.


Any recipe that starts out with half a pound of butter has got to be good, right? That was my thought going into this recipe and also my afterthought once I tasted it. This cake was easy and quick to mix up, and it tasted divine. The glaze provided the cake with a nice sugary crunch on the outside and the inside was moist and delicious just like a pound cake should be.


The vanilla flavor was just amazing, strong and distinct with the perfect vanilla flavor! I would definitely recommend this product to anyone looking for a good vanilla extract. *hint, hint* check below the recipe for a bonus giveaway from the fine folks at Singing Dog Vanilla.


Vanilla Pound Cake
Adapted from The King Arthur Flour Baker's Companion, The All-Purpose Baking Cookbook

Ingredients
CAKE
1 cup (2 sticks) butter
1 cup (7 ounces) granulated sugar
3 tablespoons ( 1 1/2 ounces) light brown sugar, packed
1/2 teaspoon salt
1 tablespoon vanilla extract
1 teaspoon baking powder
1 3/4 cups (7 1/9 ounces) unbleached all-purpose or cake flour
4 large eggs

GLAZE
1/2 cup (3 1/2 ounces) granulated sugar
1/4 cup (2 ounces) water
Pinch of salt
1 tablespoon vanilla extract

Directions
Preheat oven to 350.

For the cake - In a large mixing bowl, beat together the butter, sugars, salt, vanilla, and baking powder until smooth and fluffy. Add the flour and mix well the batter will be almost like paste. Beat in the eggs one at a time, beating well and scraping the bottom and sides of the bowl after each addition the batter will be quite fluffy.
Spoon the batter into a lightly greased 9 to 10 inch tube pan, 9 to 10 cup bundt-style pan, or 9 X5 inch loaf pan. Bake the cake for about 45 minutes, or until a cake tester inserted into the center comes out clean. Remove the cake from the oven and let it cool in the pan for 10 minutes, while you are making the glaze.

For the glaze - Bring the sugar, water, and salt to a boil in a small saucepan and boil for 1 minute. Remove the pan from the heat and stir in the vanilla

Turn the warm cake out onto a rack. Poke the cake all over with something long and thin, like a cake tester or ice pick. Slowly drizzle or brush the glaze over the cake, continuing to brush until all the glaze is used. Let the cake cool fully before slicing. Serve with sliced fresh fruit, if desired.


*** BONUS GIVEAWAY ***
The generous folks at Singing Dog Vanilla are offering one my my lucky readers a chance to sample one of their products. If you would like to be entered into a giveaway to win one of Singing Dog Vanilla's products, simply go to their
website, search around a bit. After searching come back here and leave me a comment letting me know what product you would like to try and what you plan on making with that product.

The winner will be randomly selected and announced on Sunday September 27th. Only one entry per person please. Good luck!

Tuesday, July 21, 2009

Wilton Course 1, Class 3

This week I have learned that preparing for these Wilton classes takes up the better half of a day. Thank goodness I have Monday's off of work. For last nights class I had to take a cake that was iced and smoothed along with some colored icing for practicing and decorating our cake. In class I practiced another step in the rose making process, shell borders, faces, drop flowers, swirl flowers and clowns. I should definitely start practicing those swirl flowers, I learned that my wrist just does not want to move the way it needs to.


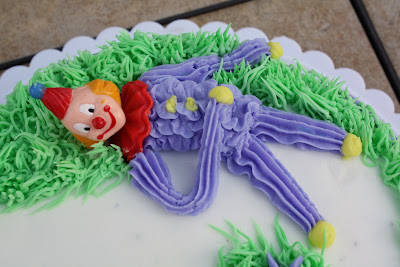
My instructor tells me I am doing great job and she thinks that I am way to much of a perfectionist. The top of the cake was iced white and the sides were iced in purple. There is a white shell border on the bottom and two lazy (possibly drunk) clowns surrounded by grass with a few drop flowers on top.


Next week is the final class of Course 1. I will learn how to finish making the rose and will also learn a couple new flowers. I am excited to end this course so I can start the second one!


I used new recipes this week so I will share them with you here. I found a recipe for Chocolate Cake on KAF's (King Arthur Flour) website and filled it with coconut cream. The people at my husbands work devoured this cake and said it tasted much better than last week's

Chocolate Cake
Adapted from
King Arthur Flour

Ingredients
2 1/4 cups King Arthur Unbleached All-Purpose Flour
1 1/2 teaspoons baking powder
1/2 teaspoon baking soda
1/2 teaspoon salt
3/4 cup unsweetened cocoa
1 3/4 cups granulated sugar
1/2 cup (1 stick) unsalted butter, very soft
1/3 cup vegetable oil
1 teaspoon vanilla extract
1 cup milk
1/2 cup coffee or water
4 large eggs

Directions
Preheat the oven to 350°F. Lightly grease and flour your choice of pan(s): one 9" x 13" pan, two 9" round pans, three 8" round pans, or the wells of two muffin tins. You can also line the muffin tins with papers, and spray the insides of the papers.
1. Place a strainer over a large mixing bowl. Measure in the flour, baking powder, baking soda, salt, cocoa, and sugar. Sift/shake the dry ingredients through the strainer into a mixing bowl, to eliminate any lumps.
2. Add the butter and mix at low speed for 1 minutes. With the mixer running, add the oil and continue mixing until the mixture looks like sand.
3. Combine the vanilla with the milk and coffee or water, and add all at once. Mix for 1 minute at low speed, stop and scrape the sides and bottom of the bowl, then mix for 30 seconds more.
4. Add the eggs one at a time, beating well at medium-high speed between additions.
5. Scrape the sides and bottom of the mixing bowl, and mix for 1 minute more. The batter will be thin.
6. Transfer the batter to the prepared pan of your choice. For layers, divide the batter among the pans. Smooth out the tops of the layers with an offset spatula or the back of a tablespoon. For cupcakes, scoop by the heaping 1/4 cup into the prepared muffin tins.
7. Bake for 34 minutes for a 9" x 13" pan; 28 to 30 minutes for 9" layers; 24 to 26 minutes for 8" layers, or 21 to 23 minutes for cupcakes.
8. The cake is done when the top springs back when very lightly touched in the center, and the edges just begin to pull away from the edge of the pan. A toothpick inserted in the center will come out clean.
9. Remove the cake from the oven and place on a rack to cool before removing it from the pan.

Coconut Cream Filling

Ingredients
1/2 cup heavy cream
1/4 cup sugar
1/2 box instant coconut cream pudding
1/8 cup coconut

Directions
Beat heavy cream and sugar with a mixer on medium high speed until mixture thickens. Fold in dry pudding and coconut. Let mixture sit in refrigerator for 20 minutes or until ready to use.

Wednesday, May 20, 2009

Funfetti Cupcakes

My best friend's birthday was the same day as my Dad's so I decided that while I was in the kitchen making the Reese's Cup Chocolate Peanut Butter Cake for my dad I would bake up some cupcakes for my friend. I wanted to make these funfetti cupcakes because I had made them before and really loved the flavor of them plus they are very festive for a birthday celebration.


This is one of the easiest and best tasting cake recipes I have ever made. Minimal ingredients and a few seconds of mixing and you have gorgeous cupcakes that are both beautiful and delicious. I used a basic buttercream frosting recipe and my favorite new icing tip. :)

Happy Birthday Stacy, I hope you enjoyed our fun day of bowling and your cupcakes.


I have to give props to my King Arthur Flour cupcake liners. They are really thick (greaseproof)and durable and absolutely adorable! I might have to order more just so I never run out.


Funfetti Cake
As seen on:
Annie's Eats

Ingredients
1 1/4 cups all-purpose flour
2 teaspoons baking powder
1/2 teaspoon salt
6 tablespoons unsalted butter, at room temperature
1 cup sugar
3 large egg whites
1 teaspoon vanilla extract
1/4 teaspoon almond extract
1/2 cup milk
1/4 cup rainbow sprinkles

Directions
1. Preheat the oven to 350 degrees F. Grease and flour the sides of two 5-inch round cake pans, and line the bottom of the pans with parchment paper.
2. In a small bowl, combine the flour, baking powder, and salt. Stir together and set aside. In the bowl of a stand mixer, cream the butter and sugar until light and fluffy. Add the egg whites to the bowl and beat until combined. Add in the vanilla and almond extracts and mix until incorporated. Mix in the dry ingredients in three additions, alternating with the milk, beginning and ending with the dry ingredients. Mix just until incorporated. Fold in the sprinkles with a spatula.
3. Divide the batter evenly between the prepared pans. Bake until a toothpick inserted in the middle comes out clean (about 30-40 minutes?) I baked my cupcakes for 20 minutes and they were perfect. Allow to cool in pans 10 minutes, then remove to a wire rack to cool completely. Frost cooled cakes as desired.

Monday, May 18, 2009

Chocolate Peanut Butter Cake

Now that I have finally graduated college I am planning on spending more time in my favorite room of the house, the kitchen. To start things off I decided to bake a cake for my dad for his birthday. I have had this recipe on my list of things to make for the longest time and was glad that I finally got the chance to make it. The cake baked up tall and beautiful and the frosting whipped up nicely.


The cake was rich and moist and the frosting was shockingly good. It tasted like a creamy smooth whipped peanut butter. It was quite perfect and accented the richness of the cake perfectly. The chopped Reese's between the layers added extra deliciousness to the cake and the halved Reese's around the edge created the perfect touch to the outside of the cake.


As soon as I delivered this cake to my Dad he wanted to cut right into it and try a piece. I am glad he offered so that I could taste to determine if I liked it and wanted to make it again or not. I think I would make it again just for the peanut butter frosting, that was my favorite part.


Reese’s Cup Chocolate Peanut Butter Cake
As seen on:
Annie's Eats

Ingredients
For the cake
2 cups all-purpose flour
1/2 cup unsweetened cocoa powder
1/2 teaspoon baking powder
1/2 teaspoon baking soda
1/2 teaspoon salt
2 sticks unsalted butter, at room temperature
1 1/2 cups sugar
2 large eggs
2 large egg yolks
1 teaspoon vanilla extract
1 cup buttermilk
4 ounces bittersweet chocolate, melted and cooled (optional)
For decorating
1 ½ – 2 batches
peanut butter frosting
Miniature Reese’s cups, halved and/or chopped

Directions
1. For the cake, center a rack in the oven and preheat the oven to 350°. Butter two 9×2” round cake pans, dust the insides with flour, tap out the excess and line the bottoms with rounds of parchment paper. Place the pans on a baking sheet.
2. In a medium bowl, whisk together the flour, cocoa powder, baking powder, baking soda and salt. Set aside.
3. In a stand mixer fitted with the paddle attachment, beat the butter on medium speed until soft and creamy. Add the sugar and beat for about 2 minutes, until thoroughly blended into the butter. Add the eggs and yolks one at a time, beating for one minute after each addition and scraping down the sides of the bowl as needed. Beat in the vanilla. Reduce the mixer speed to low and add the dry ingredients alternately with the buttermilk; add the dry ingredients in 3 additions and the buttermilk in 2 (beginning and ending with the dry ingredients). Mix each addition only until it is blended into the batter. Scrape down the bowl and add the melted chocolate, if using, folding it in with a spatula. Divide the batter between the prepared cake pans. 4. Bake for 26-30 minutes or until the cakes feel springy to the touch and start to pull away from the sides of the pans. Transfer to wire racks to cool for about 5 minutes, then run a knife around the sides of the cakes, unmold them and peel off the paper liners. Invert and cool to room temperature right side up.
5. To assemble the cake, place one cake layer on a cardboard circle covered in foil. Spread peanut butter frosting on top of the cake layer. (If desired, sprinkle with chopped Reese’s cups.) Place the second cake layer on top of the frosting. Frost the top and outside of the cake with remaining peanut butter frosting. Decorate with halved and chopped Reese’s cups as desired.

Monday, April 27, 2009

Neapolitan Cheesecake

April came and April went and I managed to completely forget to make the Daring Bakers challenge. It was post day when I finally remembered that I needed to make it but was busy working on projects and studying for finals. I was able to escape to my kitchen for a few hours today and decided I would make the cheesecake. The recipe this month was for a basic vanilla cheesecake. The daring bakers were challenges to be creative and come up with a very unique and delicious treat. After mulling over many choices I landed on making a Neapolitan cheesecake with a coconut, macadamia nut crust. The additions I made were very easy and only took a few extra minutes to put together.


After tasting this cheesecake I am really glad I decided to use all the flavors that I did. The layers of flavors along with the nuts and coconut in the crust really gave this cheesecake an outstanding flavor. This would definitely be an impressive dessert to serve to guests.


The 2009 challenge is hosted by Jenny from Jenny Bakes. She has chosen Abbey's Infamous Cheesecake as the challenge. Don't forget to head over to the new Daring Baker webiste to see what the rest of the ladies made.


Abbey's Infamous Cheesecake
(The grey lettering is what was changed from the original recipe.)

Crust
2 cups graham cracker crumbs
1/4 cup toasted coconut
1/4 cup diced macadamia nuts, toasted

1 stick butter, melted
2 tablespoons sugar
1 teaspoon vanilla extract

Basic Cheesecake
3 (8 oz) blocks of cream cheese, room temperature
1 cup sugar
3 large eggs
1 cup heavy cream
1 tablespoon lemon juice
1 tablespoon vanilla extract (or the innards of a vanilla bean)

Add-ins
4 ounces chocolate, melted and slightly cooled
1 vanilla bean
1 cup strawberry puree, strained of seeds

Directions
1. Preheat oven to 350 degrees F. Begin to boil a large pot of water for the water bath.
2. Mix together the crust ingredients and press into your preferred pan. You can press the crust just into the bottom, or up the sides of the pan too - baker's choice. Set crust aside.
3. Combine cream cheese and sugar in the bowl of a stand-mixer (or in a large bowl if using a hand-mixer) and cream together until smooth. Add eggs, one at a time, fully incorporating each before adding the next. Make sure to scrape down the bowl in between each egg. Add heavy cream, vanilla, lemon juice, and blend until smooth and creamy.
4. Divide the batter into thirds. Mix melted chocolate with one-third of the batter and pour onto crust. Add the innerds of the vanilla bean to a third of the batter and pour over chocolate batter. Add the strawberry puree to the final third of the batter and pour strawberry flavored batter over the vanilla layer.
5. Tap the pan on the counter a few times to bring all air bubbles to the surface. Place pan into a larger pan and pour boiling water into the larger pan until halfway up the side of the cheesecake pan. If cheesecake pan is not airtight, cover bottom securely with foil before adding water.
5. Bake 45 to 55 minutes, until it is almost done - this can be hard to judge, but you're looking for the cake to hold together, but still have a lot of jiggle to it in the center. You don't want it to be completely firm at this stage. Close the oven door, turn the heat off, and let rest in the cooling oven for one hour. This lets the cake finish cooking and cool down gently enough so that it won't crack on the top. After one hour, remove cheesecake from oven and lift carefully out of water bath. Let it finish cooling on the counter, and then cover and put in the fridge to chill. Once fully chilled, it is ready to serve.

Saturday, February 28, 2009

Daring Bakers Go Flourless

Sorry for the delay in posting this months recipe. Once again life's hectic plans kept me from accomplishing most of the things that I wanted to get done this month. The February 2009 challenge is hosted by Wendy of WMPE's blog and Dharm of Dad ~ Baker & Chef.We have chosen a Chocolate Valentino cake by Chef Wan; a Vanilla Ice Cream recipe from Dharm and a Vanilla Ice Cream recipe from Wendy as the challenge.


For the cake, I used some Scharffen Berger dark chocolate that had been sitting in my cabinet waiting for the perfect recipe to come along. Although I do not really care for dark chocolate my husband loves it so this cake was completely for him. I also cut the recipe in half and baked it in a 6" round pan. This recipe was very simple and quick to make and the end results were two thumbs up. I am already planning on making this recipe for Easter so that my gluten-free relatives can enjoy it.


The ice cream recipe that I chose was one that I have heard a lot of raves about lately. I decided to go ahead and try it out, using strawberry cake mix. This was my first time making a "Philadelphia-style" ice cream recipe. For some reason I had an irrational fear that ice cream without the custard base was not real ice cream. Apparently I was over working myself and a glutton for punishment, this style of ice cream is just as delicious as the custard based French-style. Actually this ice cream was so delicious that I think I will start making more recipes just like it. Feel free to check out the other ice cream recipes on my blog.


As always, feel free to visit the Daring Bakers Blogroll and see the beautiful cake and ice cream combinations that the other members made this month.


Chocolate Valentino
Source: Chef Wan

Ingredients
16 ounces (1 pound) semisweet chocolate, roughly chopped
½ cup (1 stick) plus 2 tablespoons unsalted butter
5 large eggs, separated

Directions
1. Put chocolate and butter in a heatproof bowl and set over a pan of simmering water (the bottom of the bowl should not touch the water) and melt, stirring often.
2. While your chocolate butter mixture is cooling. Butter your pan and line with a parchment circle then butter the parchment.
3. Separate the egg yolks from the egg whites and put into two medium/large bowls.
4. Whip the egg whites in a medium/large grease free bowl until stiff peaks are formed (do not over-whip or the cake will be dry).
5. With the same beater beat the egg yolks together.
6. Add the egg yolks to the cooled chocolate.
7. Fold in 1/3 of the egg whites into the chocolate mixture and follow with remaining 2/3rds. Fold until no white remains without deflating the batter.
8. Pour batter into prepared pan, the batter should fill the pan 3/4 of the way full, and bake at 375F/190C
9. Bake for 25 minutes until an instant read thermometer reads 140F/60C. Note – If you do not have an instant read thermometer, the top of the cake will look similar to a brownie and a cake tester will appear wet.
10. Cool cake on a rack for 10 minutes then unmold.

Cake Batter Ice Cream
Adapted from Carries Sweet Life, originally from Delicious Meliscious

Ingredients
1 cup whole milk, well chilled
3/4 cup granulated sugar
2 cups heavy cream, well chilled
1 teaspoon pure vanilla extract
2/3 cup cake mix (any flavor you prefer)

Directions
- In a medium bowl, whisk the milk and granulated sugar until the sugar is dissolved. Stir in the heavy cream and vanilla. Stir in cake mix, making sure there are no lumps.
- Pour mixture into the freezer bowl of your ice cream maker and let mix until it has thickened (about 25-30 minutes).
- Remove ice cream from freezer bowl and place into a separate container. Place freezer bowl and the ice cream into the freezer to further harden.

Thursday, January 8, 2009

Brownie Mosaic Cheesecake

Last year Chelle and Annie made this amazing looking cheesecake; once I saw it I knew that I had to make it. Only problem was that I needed a reason to make it. The in-laws were over for dinner last night and I decided that would be the perfect opportunity to make this cheesecake.


This cheesecake consists of 4 parts; fudgy brownies, chocolate cookie crust, rich velvety cheesecake, and a chocolate ganache glaze. Although this recipe had 4 different parts it was no harder than making any other cheesecake, the directions were straight forward and simple to follow. I think that the brownie recipe could be halved, it made double the amount needed for the cheesecake. On the other hand I think the cookie crust should be doubled. It was a perfect crust with lots of butter to help keep it together.


I made the brownies and cheesecake the first day, then I placed the cooled baked cheesecake in the fridge overnight to set up. The next morning I made and topped the cheesecake with the ganache glaze and stored it in the fridge for a few hours to set the chocolate.


This cheesecake was outstanding. With all the chocolate involved one would think it would be overly rich and indulgent but it really was not. The cheesecake was smooth and velvety with the perfect amount of richness. I will definitely make this cheesecake again, especially if I am looking for a dessert to impress.

Brownie Mosaic Cheesecake
As seen on
Annie's Eats and Brown Eyed Baker; originally from Smitten Kitchen

For the Brownies
Ingredients
4 ounces unsweetened chocolate
3/4 cup (1 1/2 sticks) unsalted butter
13/4 cups sugar
3 eggs
1 teaspoon vanilla
1/2 teaspoon salt
1 cup flour

Directions
Preheat oven to 350°F. Line 13×9-inch baking pan with foil, with ends of foil extending over sides of pan. Grease foil.

Microwave chocolate and butter in large microwaveable bowl on high 2 min. or until butter is melted. Stir until chocolate is completely melted. Stir in sugar. Blend in eggs and vanilla. Add flour and salt; mix well. Spread into prepared pan.

Bake 30 to 35 minute or until toothpick inserted in center comes out with fudgy crumbs (be careful not to over bake). Cool in pan on wire rack. Remove brownies from pan, using foil handles.

Cool brownies, then cut them into 3/4- to 1-inch squares for use in the cheesecake. You will have more than the two cups of cubes, loosely measured, than you will need, and I’m sorry, you’re just going to have to decide for yourself what to do with the extra. Add cubes to cake batter as directed below.

For the Crumb Crust
(if you like a lot of crust, go ahead and double this)
Ingredients
11/2 cups or 5 ounces finely ground Oreos, or other chocolate cookie
5 tablespoons unsalted butter, melted
1/3 cup granulated sugar
1/8 teaspoon salt

Directions
Stir together ingredients and press into bottom and 1 inch up side of a buttered 10″ springform pan. Fill right away or chill for up to 2 hours.

For the Cheesecake
Ingredients
3 (8-oz) packages of cream cheese, softened
1 cup granulated sugar
4 large eggs
1 teaspoon vanilla

Directions
Make crumb crust as directed above for 10-inch cheesecake. Preheat oven to 350°F.
Beat together cream cheese and sugar with an electric mixer until fluffy. Add eggs, 1 at a time, then vanilla, beating on low speed until each ingredient is incorporated and scraping down bowl between additions.

Fold brownie cubes in very gently and pour mixture into prepared pan. Put springform pan with crust in a shallow baking pan. Pour filling into crust and bake in baking pan (to catch drips) in middle of oven 45 minutes, or until cake is set 3 inches from edge but center is still slightly wobbly when pan is gently shaken.

When completely cool, top with following glaze.

For the Ganache Glaze
Ingredients
3 oz. bittersweet chocolate, finely chopped
4 tablespoons (½ stick) unsalted butter
¼ cup heavy cream
½ teaspoon vanilla
1 tablespoon powdered sugar

Directions
Place finely chopped chocolate in a medium size mixing bowl. Scald the butter and cream together in a saucepan (or in the microwave on high for 1 minute). Pour the cream mixture over the chocolate and stir until the chocolate is completely melted. Whisk in vanilla and then whisk in powdered sugar until smooth. Spread over cheesecake while ganache is still warm.
Chill the cheesecake until ready to serve.

Tuesday, December 16, 2008

Perfectly Smashable Cake

Remember the other day when I posted the red velvet cake and said it was for the first birthday of a little cutie pie? Well this cake accompanied the red velvet cake to the party. This is the chocolate cake that I made for the birthday boy's smash cake but also made 18 cupcakes out of. I think he enjoyed it, what do you think? See the green sugar dot earring, hilarious!


Anyway, this cake was a hit with the one year old and also with those that had the cupcakes. I won't lie, my cupcakes came out flat and the cake was a pain in the butt to frost but I think that's because I over mixed the batter because I was doing 1802198 things at once. Oopsie. Great basic chocolate cake recipe that I hope to try again soon.


Hersheys "Perfectly Chocolate" Chocolate Cake
Source:
Hershey's

-Serves 10 to 12-

Ingredients
2 cups sugar
1-3/4 cups all-purpose flour
3/4 cup HERSHEY'S Cocoa
1-1/2 teaspoons baking powder
1-1/2 teaspoons baking soda
1 teaspoon salt
2 eggs
1 cup milk
1/2 cup vegetable oil
2 teaspoons vanilla extract
1 cup boiling water
"Perfectly Chocolate" Chocolate Frosting (recipe follows)

Directions
1. Heat oven to 350°F. Grease and flour two 9-inch round baking pans.
2. Stir together sugar, flour, cocoa, baking powder, baking soda and salt in large bowl. Add eggs, milk, oil and vanilla; beat on medium speed of mixer 2 minutes. Stir in boiling water (batter will be thin). Pour batter into prepared pans.
3. Bake 30 to 35 minutes or until wooden pick inserted in center comes out clean. Cool 10 minutes; remove from pans to wire racks. Cool completely. Frost with "Perfectly Chocolate" Chocolate Frosting.

Variations
ONE PAN CAKE: Grease and flour 13x9x2-inch baking pan. Heat oven to 350° F. Pour batter into prepared pan. Bake 35 to 40 minutes. Cool completely. Frost.
THREE LAYER CAKE: Grease and flour three 8-inch round baking pans. Heat oven to 350°F. Pour batter into prepared pans. Bake 30 to 35 minutes. Cool 10 minutes; remove from pans to wire racks. Cool completely. Frost.
BUNDT CAKE: Grease and flour 12-cup Bundt pan. Heat oven to 350°F. Pour batter into prepared pan. Bake 50 to 55 minutes. Cool 15 minutes; remove from pan to wire rack. Cool completely. Frost.
CUPCAKES: Line muffin cups (2-1/2 inches in diameter) with paper bake cups. Heat oven to 350°F. Fill cups 2/3 full with batter. Bake 22 to 25 minutes. Cool completely. Frost. About 30 cupcakes.


"Perfectly Chocolate" Chocolate Frosting
Source:
Hershey's


Ingredients
1/2 cup (1 stick) butter or margarine
2/3 cup HERSHEY'S Cocoa
3 cups powdered sugar
1/3 cup milk
1 teaspoon vanilla extract

Directions
Melt butter. Stir in cocoa. Alternately add powdered sugar and milk, beating to spreading consistency. Add small amount additional milk, if needed. Stir in vanilla. About 2 cups frosting. (I like to whip the frosting in the mixer to give it a more fluffy look and taste.)

Monday, December 15, 2008

Red Velvet Cake

Today is my friend Annie's sons first Birthday. She asked me if I would mind making the cake(s) for his birthday party and of course I could not say no. Annie knew she wanted a chocolate cake for her son but she also thought that a red velvet cake sounded good. Of course I was up for that challenge since I had never made or even ate a red velvet cake before. I asked around on my favorite cooking board and Annie recommended the one she had made for her brother's high school graduation. I went ahead and used that recipe and it turned out excellent.


This cake came together very quickly and was pretty easy to work with and frost. Everyone at the party loved the cake and some even went back for seconds. This is definitely a cake that I will make again if I am ever feeling the urge for a fun red cake. The cream cheese frosting went perfectly with the flavor of this cake.


Red Velvet Cake
Source:
Annie's Eats

-Serves 12 to 14 -

Ingredients
2 eggs
1 1/2 cups sugar
1 1/2 cups vegetable oil
1 tsp white vinegar
2 1/2 cups cake flour
1 tsp baking soda
3 tbsp cocoa powder
1 cup buttermilk
1 tsp vanilla
5/8 ounce bottle red food coloring

Directions
Preheat the oven to 350F. Line the bottom of two 9-inch round cake pans with parchment paper. Cream the eggs, sugar, oil and vinegar. Sift the cake flour, baking soda, and cocoa together. Add the flour mixture to the creamed ingredients while beating. Slowly add the buttermilk. While still beating, add the vanilla and the food coloring. Pour into prepared cake pans and bake for about 25 minutes. Press lightly; if the layers are spongy, then the cake is done. Frost the cooled layers, assemble and frost the top and sides.

Cream Cheese Frosting
Adapted from:
Cook's Illustrated

Ingredients
12 ounces cream cheese , softened but still cool
7 1/2 tablespoons unsalted butter softened, but still cool
2 tablespoon sour cream
1 teaspoon vanilla extract
2 1/2 cups confectioners' sugar

Directions
Mix cream cheese, butter, sour cream, and vanilla at medium high speed in clean bowl of standing mixer fitted with whisk attachment ( or in large bowl using handheld mixer) until well combined, about 30 seconds, scraping down bowl with rubber spatula as needed. Add confectioners’ sugar and mix until very fluffy, about 1 minute.

Friday, November 28, 2008

Caramel Cake, Daring Bakers Style

Happy Daring Bakers post day to all my fellow food loving friends. This month our challenge was to make a very sweet and indulgent sounding caramel cake with caramelized butter frosting. This cake came together very smoothly for me and baked up beautifully. The smell and taste of the caramel syrup made me crave caramel corn very much, I'll have to make some soon. :) The icing came together very smoothly also. I did not use the entire pound of powdered sugar. I would say I used between 9 and 10 ounces though. I also added much more heavy cream to the frosting than called for to try and counteract all the grittyness of the powdered sugar. I also forgot to add in the salt, oopsie.


I took this cake to my aunt's house for Thanksgiving and it was a hit with everyone that tried it. The cake was so moist and light with the perfect hint of caramel sweetness. I will admit, I was a little scared about the frosting. It tasted amazing but I wasn't so sure I would like it on the cake. I thought it would still have the powdered sugar grit taste to it but all in all you could barely tell. The cake tasted so light, obviosuly it was far from being healthy but it was the perfect ending to a very filling Thanksgiving meal. I am glad that I got a chancet o make this cake. It was amazing and I might even make it again. My friend was already hinting that it would be great for her son's birthday party. :) Please excuse my sloppy swirly frosting job. I decorated it on Thanksgiving morning when I was also cooking up 3 batches of garlic knots and some green bean casserole from scratch.


A big thank you goes out to this months hosts, Dolores of Chronicals in Culinary Curiosity Alex of Brownie of the Blondie and Jenny of Foray into Food. As always check out the Daring Bakers Blogroll to see the other beautiful cakes made by the very talented DB'ers.
- One year ago the Daring Bakers tackled
Tender Potato Bread. -


Caramel Cake With Caramelized Butter Frosting
Source:
Shuna Fish Lydon, as published on Bay Area Bites

Ingredients
10 Tablespoons unsalted butter at room temperature
1 1/4 Cups granulated sugar
1/2 teaspoon kosher salt
1/3 Cup Caramel Syrup (see recipe below)
2 each eggs, at room temperature
splash vanilla extract
2 Cups all-purpose flour
1/2 teaspoon baking powder
1 cup milk, at room temperature

Directions
1. Preheat oven to 350F
2. Butter one tall (2 – 2.5 inch deep) 9-inch cake pan.
3. In the bowl of a stand mixer fitted with a paddle attachment, cream butter until smooth. Add sugar and salt & cream until light and fluffy.
4. Slowly pour room temperature caramel syrup into bowl. Scrape down bowl and increase speed. Add eggs/vanilla extract a little at a time, mixing well after each addition. Scrape down bowl again, beat mixture until light and uniform.
5. Sift flour and baking powder.
6. Turn mixer to lowest speed, and add one third of the dry ingredients. When incorporated, add half of the milk, a little at a time. Add another third of the dry ingredients, then the other half of the milk and finish with the dry ingredients. {This is called the dry, wet, dry, wet, dry method in cake making. It is often employed when there is a high proportion of liquid in the batter.}
7. Take off mixer and by hand, use a spatula to do a few last folds, making sure batter is uniform. Turn batter into prepared cake pan.
8. Place cake pan on cookie sheet or 1/2 sheet pan. Set first timer for 30 minutes, rotate pan and set timer for another 15-20 minutes. Your own oven will set the pace. Bake until sides pull away from the pan and skewer inserted in middle comes out clean. Cool cake completely before icing it.
9. Cake will keep for three days outside of the refrigerator.


Caramel Syrup
Source:
Shuna Fish Lydon, as published on Bay Area Bites

Ingredients
2 cups sugar
1/2 cup water
1 cup water (for "stopping" the caramelization process)

Directions
1. In a small stainless steel saucepan, with tall sides, mix water and sugar until mixture feels like wet sand. Brush down any stray sugar crystals with wet pastry brush. Turn on heat to highest flame. Cook until smoking slightly: dark amber.
2. When color is achieved, very carefully pour in one cup of water. Caramel will jump and sputter about! It is very dangerous, so have long sleeves on and be prepared to step back.
3. Whisk over medium heat until it has reduced slightly and feels sticky between two fingers. {Obviously wait for it to cool on a spoon before touching it.}
Note: For safety reasons, have ready a bowl of ice water to plunge your hands into if any caramel should land on your skin.

Caramelized Butter Frosting
Source:
Shuna Fish Lydon, as published on Bay Area Bites

Ingredients
12 tablespoons unsalted butter
1 pound confectioner’s sugar, sifted
4-6 tablespoons heavy cream
2 teaspoons vanilla extract
2-4 tablespoons caramel syrup
Kosher or sea salt to taste

Directions
1. Cook butter until brown. Pour through a fine meshed sieve into a heatproof bowl, set aside to cool.
2. Pour cooled brown butter into mixer bowl.
3. In a stand mixer fitted with a paddle or whisk attachment, add confectioner's sugar a little at a time. When mixture looks too chunky to take any more, add a bit of cream and or caramel syrup. Repeat until mixture looks smooth and all confectioner's sugar has been incorporated. Add salt to taste.
Note: Caramelized butter frosting will keep in fridge for up to a month. To smooth out from cold, microwave a bit, then mix with paddle attachment until smooth and light.

Sunday, August 24, 2008

Toasted Butter Pecan Cake

This weekend my husband and I went out of town to visit with his grandparents and meet a few family members we had never met before. I was asked if I would like to make dessert and I graciously accepted. I had not made a cake in a while so I figured that would be the perfect treat. At first I contemplated making a red velvet cake because I had never made one before but once I found this recipe for a toasted butter pecan cake I just knew I had to make it.


The recipe came together pretty easily and quickly which was a good thing since I did not get to start it until 9:00 at night! I used parchment paper on the bottom of my pans to assure that the cake did not stick. On two of my pans I used
Wilton's Bake-even strips and I was amazed that they actually worked. Those two pans rose perfectly and were straight across with no sign of a hump in the middle while the pan that did not have the strip on the outside had the typical mound in the center of the pan. I highly recommend purchasing the bake-even strips if you like to see perfectly straight cake tops and do not want to worry about having to straighten them yourself.


This cake got rave reviews, everyone loved it. I thought that it was a little dry but my husband thought that I was crazy for saying that. It was nice that this cake was baked into three pans so I did not have to worry about slicing layers in half, it made the assembly that much quicker. This is a cake that I would make again, it has beautiful presentation with the nuts sprinkled on top and I like that it was paired with cream cheese frosting.


Toasted Butter Pecan Cake
Source:
Taste of Home

Ingredients
1 cup plus 2 tablespoons butter, softened, divided
2-2/3 cups chopped pecans
2 cups sugar
4 eggs
2 teaspoons vanilla extract
3 cups all-purpose flour
2 teaspoons baking powder
1/2 teaspoon salt
1 cup milk

Frosting
2 packages (one 8 ounces, one 3 ounces) cream cheese, softened
2/3 cup butter, softened
6-1/2 cups confectioners' sugar (I felt this was to much, I only used about 5 cups)
1-1/2 teaspoons vanilla extract
1 to 2 tablespoons milk

Directions
In a small heavy skillet, melt 2 tablespoons butter. Add pecans; cook over medium heat until toasted, about 4 minutes. Set aside to cool.

In a large mixing bowl, cream sugar and remaining butter until light and fluffy. Add eggs, one at a time, beating well after each addition. Beat in vanilla. Combine the flour, baking powder and salt; add to creamed mixture alternately with milk. Beat just until combined. Fold in 2 cups reserved pecans. Spread evenly into three greased and waxed paper-lined 9-in. round baking pans.

Bake at 350° for 25-30 minutes or until a toothpick inserted near the center comes out clean. Cool for 10 minutes before removing from pans to wire racks to cool completely.

For frosting, in a large mixing bowl, beat the cream cheese, butter, confectioners' sugar and vanilla. Beat in enough milk to achieve spreading consistency. Spread frosting between layers and over top and sides of cake. Sprinkle with remaining pecans. Store in the refrigerator.

Monday, July 14, 2008

Blueberry Cheesecake

This was the first of the desserts that I made with my many pounds of freshly picked blueberries. I asked my husband what he wanted me to make and he said he did not care. I started naming off all of the blueberry things I could think of. He said, just write them all down, put them into a bowl and pick one. Humm, what a good idea! Ten minutes later I ran out to the living room requesting that my husband pick a piece of paper out of the colander. :)


As you can see by the pictures the whole swirling in of the blueberries thing did not quite work out. I ended up with a layer on top instead. Next time I would put the batter in the pan in thirds, swirling in some of the blueberry puree after each addition of batter.

At first my husband was a bit skeptical of the thought of blueberry cheesecake but he ended up really enjoying it. Although I am not a huge fan of cheesecake, I enjoyed it also. There was just enough blueberry flavor and the vanilla wafers added a great extra flavor to the crust.

This cheesecake was so un-photogenic that I almost did not blog about it. My husband pretty much refused to eat a piece until I took pictures so I decided to appease him and take some. Unfortunately, you are only going to see one of those pictures because my camera did not seem to like the dark glossy colored topping.


Blueberry Cheesecake
Source: Cookinglight.com

Ingredients

CRUST
2/3 cup graham cracker crumbs (about 5 cookie sheets)
2/3 cup reduced-fat vanilla wafer crumbs (about 20 cookies)
3 tablespoons sugar
3 tablespoons butter, melted

FILLING

2 1/2 cups fresh or frozen wild blueberries, thawed
1 tablespoon cornstarch
2 1/2 (8-ounce) blocks fat-free cream cheese, softened
1 (8-ounce) block 1/3-less-fat cream cheese, softened
1 cup sugar
2 tablespoons cornstarch
1/4 teaspoon salt
5 large eggs

TOPPING
1 1/2 cups fat-free sour cream
2 tablespoons sugar
1/2 teaspoon vanilla extract

SAUCE
1/4 cup sugar
1/4 cup water
1 cup fresh or frozen, thawed, wild blueberries

Preparation
1. Preheat oven to 325°.

2. To prepare crust, combine first 3 ingredients in a medium bowl. Drizzle with butter; toss with a fork until moist. Firmly press mixture into bottom of a 9-inch springform pan coated with cooking spray. Bake at 325° for 10 minutes; cool on a wire rack.

3. To prepare filling, combine 2 1/2 cups blueberries and 1 tablespoon cornstarch in a food processor, and process until smooth. Place puree in a small saucepan; bring to a boil. Cook 6 minutes or until slightly thick, stirring constantly. Cool slightly. Reserve 1/2 cup blueberry puree for sauce; set remaining 1 cup blueberry puree aside.


4. Place cheeses in a large bowl; beat with a mixer at high speed for 3 minutes or until smooth. Combine 1 cup sugar, 2 tablespoons cornstarch, and salt. Add sugar mixture to cheese mixture; beat well. Add eggs, 1 at a time, beating well after each addition. Pour batter over prepared crust. Pour 1 cup blueberry puree over batter; gently swirl with a knife. Bake at 325° for 1 hour and 10 minutes or until cheesecake center barely moves when pan is touched. Remove cheesecake from oven (do not turn oven off); place cheesecake on a wire rack.

5. To prepare topping, combine sour cream, 2 tablespoons sugar, and vanilla in a small bowl, stirring well. Spread sour cream mixture evenly over cheesecake. Bake at 325° for 10 minutes. Remove cheesecake from oven; run a knife around outside edge. Cool to room temperature. Cover and chill at least 8 hours. Remove sides of springform pan.

6. To prepare sauce, combine reserved 1/2 cup blueberry puree, 1/4 cup sugar, and water in a small saucepan. Cook over medium heat for 8 minutes or until sauce is thick, stirring constantly. Gently fold in 1 cup blueberries. Remove from heat, and cool. Serve sauce with cheesecake.

Saturday, June 28, 2008

Dorie's Delicious Brownie Cake

I finally jumped on the bandwagon and purchased Dorie's cookbook, Baking: From My Home To Yours. Wow, it is such an amazing book that is packed full of awesome looking and sounding recipes. After looking through the book in it's entirety I decided that this Caramel-Peanut-Topped Brownie Cake would be the first recipe I made from the book.


The homemade caramel on the top of this cake is to die for. The mix of salty peanuts and sweet caramel really takes this brownie cake to the next level. The cake was enjoyed by all and even the pain of the burn I obtained on the tip of my middle finger, from making the caramel, won't hinder me from making this cake again. One minor problem I had with the cake was cutting it, I used a serrated knife to saw through the peanuts. It was actually quite hilarious. My advice would be to cut the cake before putting the caramel and peanut on top, so you don't have to saw through the peanuts like I did.


For the record... No, I am not planning on joining TWD. Instead I will make various recipes from the book when I want to make them. :)


Caramel-Peanut-Topped Brownie Cake
Source: Baking: Form My Home To Yours by Dorie Greenspan

For The Cake
1 cup all-purpose flour

1 teaspoon baking soda
1/4 teaspoon salt
1 stick (8 tablespoons) unsalted butter, cut into 8 pieces
5 ounces bittersweet chocolate, coarsely chopped
3 large eggs
1/2 cup light brown sugar
1/4 cup sugar
3 tablespoons light corn syrup
1/2 teaspoon vanilla extract

For The Topping

2 cups sugar

1/2 cup water
1 1/2 tablespoons light corn syrup
2/3 cup heavy cream
2 tablespoon unsalted butter, at room temperature
1 cup salted peanuts

Getting Ready

Center a rack in the oven and preheat the oven to 350 degrees F. Butter a 8 inch round springform pan, dust the inside with flour, tap out the excess and line the bottom of the pan with a piece parchment or wax paper. Put the pan on a baking sheet lined with parchment or a silicone mat.


To Make The Cake
Whisk the flour, baking soda and salt together.

Set a heatproof bowl over a saucepan of gently simmering water, put the butter and chocolate in the bowl and heat, stirring occasionally, until the ingredients have just melted - you don't want them to get so hot that the butter separates. Remove bowl from the heat.

In a large bowl whisk the eggs and sugars together until well blended. Whisk in the corn syrup, followed by the vanilla. Whisk in the melted butter and chocolate. Still working with a whisk, gently stir in the dry ingredients, mixing only until they are incorporated. You will have a thick, smooth, shiny batter. Pour the batter into the pan and jiggle the pan a bit to even out the batter.

Bake the cake at 350F for 40-45 minutes, or until a knife inserted into the center comes out almost clean (You might find some moist crumbs clinging to the blade). Transfer the pan to a rack and cool the cake for 15 minutes, then run a blunt knife between the cake and the pan and remove the sides of the pan. During baking the cake probably will have puffed to the top of the pan don’t be concerned if it sinks a little or it if develops a crater in the center. Cool the cake to room temperature.

When the cake is completely cool, invert it, remove the base of the pan and peel off the paper. Wash and dry the springform pan, and return the cake to it right side up. Refasten the sides around the cake.

To Make The Topping
Put the sugar, water and corn syrup in a medium heavy bottomed saucepan, stir just to combine the ingredients and then put the pan over medium-high heat. Heat, without stirring , until the caramel turns deep amber., 5-10 minutes depending on the size of your saucepan and the intensity of the heat. As the sugar is caramelizing wipe down any splatters on the side of the pan with a pastry brush dipped in cold water. To test the caramel drop a bit on a while plate, don't be timid about the color. If its to pale it wont have much taste.


Lower the heat a bit and, standing back from the saucepan, the caramel will butter and splatter, add the cream and butter. When the spatters are less vehement, stir to calm down the caramel and dissolve any lumps. Stir in the peanuts, and pour the caramel and peanuts into a 1-quart Pyrex measuring cup or heat proof bowl.

You've probably got more caramel than you need but you want to get all the peanuts on the cake. So spoon the peanuts out of the hot caramel onto the cake. After you've done that pour or spoon on the caramel to cover all the nuts. You’ll have a layer about ¼ inch high. Allow the topping to set to room temperature-about 20 minutes before serving. Keep the leftover caramel at room temperature and then make caramel sauce. Or when it's cool, refrigerate it until you are ready to make the sauce.

At serving time, you should be able to just run a blunt knife between the caramel and the pan and simply remove the sides of the springform. If this isn’t the case, hit the sides with some hot air from a hairdryer or wrap the sides in a towel moistened with hot water. Bring the whole cake to the table on a platter, so that you can get some "oohs."

Sunday, May 4, 2008

The Lightest Cake of Them All

Last weekend I was browsing through the cooking and baking aisles at Meijer and happened to see an angel food cake pan on clearance. My husband loves angel food cake but I have never bought or made one for him. I figured I might as well buy the pan because it would work great for monkey bread too. I knew the cake took lots of egg whites so I grabbed a dozen eggs and decided I would make angel food cake with the egg whites and ice cream with the egg yolks.


My friend Jessica made this recipe a couple weeks ago (with a few slight modifications) and just raved about it and said I had to try it. So try it I did. She was right, this cake was so light and fluffy and amazing. Such a breeze to whip up too. Next time, I might try to reduce the sugar a little bit, the cake was a little more sugary than I remember angel food cake being. Thumbs up all the way around from everyone that tried the cake.

Here is a picture of the cutest little angel food cake thief I have ever seen. Little Jake decided that his dad did not deserve the cake and wanted to try it himself.

Don't forget to come back soon to check out the ice cream recipe I picked, it is still in liquid state chilling in the fridge but it tastes amazing!!

Angel Food Cake
Source:
Baking Illustrated, by Cooks Illustrated

Ingredients
1 cup (3 ounces) sifted cake flour
1 1/2 cups (10 1/2 ounces) sifted granulated sugar
12 large egg whites (1 3/4 cups plus 2 tablespoons), at room temperature
1 teaspoon cream of tartar
1/4 teaspoon table salt
1 1/2 teaspoons vanilla extract
1 1/2 teaspoons juice from one lemon
1/2 teaspoon almond extract

Directions
1. Adjust an oven rack to the lower-middle position and heat oven to 325 degrees. Have ready an ungreased large tube pan (9-inch diameter, 16-cup capacity), preferably with a removable bottom. If the pan bottom is not removable, line it with parchment or wax paper.
2. Whisk the flour with 3/4 cup sugar in a small bowl. Place remaining 3/4 cup sugar in another small bowl next to the mixer.
3. Beat the egg whites in the bowl of a standing mixer at low speed until just broken up and beginning to froth. Add the cream of tartar and salt and beat at medium speed until whites form very soft, billowy mounds. With the mixer still at medium speed, beat in 3/4 cup sugar, 1 tablespoon at a time, until all sugar is added and the whites are shiny and form soft peaks. Add vanilla, lemon juice, and almond extract and beat until just blended.

4. Place the flour-sugar mixture in a sifter set over waxed paper. Sift flour-sugar mixture over egg whites about 3 tablespoons at a time, and gently fold it in, using a large rubber spatula. Sift any flour-sugar mixture that falls onto the paper back into the bowl with the whites.
5. Gently scrape the batter into the pan, smooth the top with a spatula, and give pan a couple of raps on the counter to release any large air bubbles.
6. Bake until the cake is golden brown and the top springs back when pressed firmly, 50 to 60 minutes.
7. If the cake pan has prongs around the rim for elevating the cake, invert pan onto them. If the pann does not have prongs, invert pan over the neck of a bottle or funnel so that air can circulate all around it. Let the cake cool completely, 2 to 3 hours.
8. To unmold, run a knife around edges of the pan, being careful not to separate the golden crust from the cake. Slide cake out of pan and cut the same way around removable bottom to release, or peel off parchment or wax paper, if used. Place the cake, bottom-side up, on a platter. Cut slices by sawing gently with a serrated knife. Serve the cake the day it is made.

Serves 10-12
Per Serving: Cal 150; Fat 0 g; Sat fat 0 g; Chol 0 mg; Carb 33 g; Protein 4 g; Fiber 0 g; Sodium 105 mg

Saturday, April 5, 2008

Who Put Carrots in my Cake?

After making and decorating my cake for the daring baker challenge last month I got a little bug and decided I really wanted to make some more cakes and/or cupcakes just so that I could decorate them. I had a 50% off coupon for Michael's craft store so I went and bought myself a Wilton cake decorating tool caddy that is packed full of tips, pastry bags and goodies. No matter what, I was determined to bake something this weekend that I could decorate.

Last night I found out that we were getting together to celebrate my father-in-laws birthday. I pretty much begged my mother-in-law to let me make a cake. She said she was going to make a carrot cake but she would gladly had the responsibility over to me, so of course I jumped at the chance. Because, well, I don't have a carrot cake in my blog yet and it would give me a chance to bake and decorate, SCORE! :)
I was debating between using the Cook's Illustrated recipe and
The Joy of Baking recipe but decided to go with the Cook's Illustrated because I already had the cookbook (Baking Illustrated) and my lazy self would not have to print out the recipe. :)


Once again Cook's Illustrated did not let me down, this was an amazing cake and it got rave reviews from the in-laws. I even heard "this is the best carrot cake I have ever had". If you decide to make the layer cake instead of the 9 x 13 I would recommend making more cream cheese frosting than the recipe calls for. I doubled it and had some left so I think if you were to make it 1.5 times it would be perfect.


Carrot Cake with Cream Cheese Frosting
Source: Baking Illustrated, by Cooks Illustrated

If you like nuts in your cake, stir 1 1/2 cups toasted chopped pecans or walnuts into the batter along with the carrots. Raisins are also a good addition; 1 cup can be added along with the carrots. If you add both nuts and raisins, the cake will need an additional 10 to 12 minutes in the oven. Below are instructions for using a hand-held or standing mixer.

Carrot Cake
2 1/2 cups unbleached all-purpose flour (12 1/2 ounces)
1 1/4 teaspoons baking powder
1 teaspoon baking soda
1 1/4 teaspoons ground cinnamon
1/2 teaspoon ground nutmeg
1/8 teaspoon ground cloves
1/2 teaspoon table salt
1 pound medium carrots (6 to 7 carrots), peeled
1 1/2 cups granulated sugar (10 1/2 ounces)
1/2 cup packed light brown sugar (3 1/2 ounces)
4 large eggs
1 1/2 cups vegetable oil , safflower oil, or canola oil

Cream Cheese Frosting
8 ounces cream cheese , softened but still cool
5 tablespoons unsalted butter softened, but still cool
1 tablespoon sour cream
1/2 teaspoon vanilla extract
1 1/4 cups confectioners' sugar (4 1/2 ounces)

Directions
1. For the cake: Adjust oven rack to middle position; heat oven to 350 degrees. Spray 13 by 9-inch baking pan (or 2, 9" round cake pans) with nonstick cooking spray. Line bottom of pan with parchment and spray parchment.
2. Whisk together flour, baking powder, baking soda, cinnamon, nutmeg, cloves, and salt in large bowl; set aside.
3. In food processor fitted with large shredding disk (see below for mixer method), shred carrots (you should have about 3 cups); transfer carrots to bowl and set aside. Wipe out food processor workbowl and fit with metal blade. Process granulated and brown sugars and eggs until frothy and thoroughly combined, about 20 seconds. With machine running, add oil through feed tube in steady stream. Process until mixture is light in color and well emulsified, about 20 seconds longer. Scrape mixture into medium bowl. Stir in carrots and dry ingredients until incorporated and no streaks of flour remain. Pour into prepared pan and bake until toothpick or skewer inserted into center of cake comes out clean, 35 to 40 minutes, rotating pan halfway through baking time. Cool cake to room temperature in pan on wire rack, about 2 hours.
4. For the frosting (See below for mixer method): When cake is cool, process cream cheese, butter, sour cream, and vanilla in clean food processor workbowl until combined, about 5 seconds, scraping down bowl with rubber spatula as needed. Add confectioners' sugar and process until smooth, about 10 seconds.
5. Run paring knife around edge of cake to loosen from pan. Invert cake onto wire rack, peel off parchment, then invert again onto serving platter. Using icing spatula, spread frosting evenly over surface of cake. Cut into squares and serve. (Cover leftovers and refrigerate for up to 3 days.)