This week I have learned that preparing for these Wilton classes takes up the better half of a day. Thank goodness I have Monday's off of work. For last nights class I had to take a cake that was iced and smoothed along with some colored icing for practicing and decorating our cake. In class I practiced another step in the rose making process, shell borders, faces, drop flowers, swirl flowers and clowns. I should definitely start practicing those swirl flowers, I learned that my wrist just does not want to move the way it needs to.

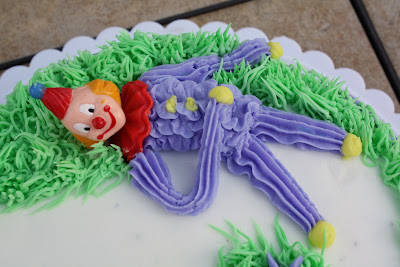
My instructor tells me I am doing great job and she thinks that I am way to much of a perfectionist. The top of the cake was iced white and the sides were iced in purple. There is a white shell border on the bottom and two lazy (possibly drunk) clowns surrounded by grass with a few drop flowers on top.

Next week is the final class of Course 1. I will learn how to finish making the rose and will also learn a couple new flowers. I am excited to end this course so I can start the second one!
I used new recipes this week so I will share them with you here. I found a recipe for Chocolate Cake on KAF's (King Arthur Flour) website and filled it with coconut cream. The people at my husbands work devoured this cake and said it tasted much better than last week's
Chocolate Cake
Adapted from King Arthur Flour
Ingredients
2 1/4 cups King Arthur Unbleached All-Purpose Flour
1 1/2 teaspoons baking powder
1/2 teaspoon baking soda
1/2 teaspoon salt
3/4 cup unsweetened cocoa
1 3/4 cups granulated sugar
1/2 cup (1 stick) unsalted butter, very soft
1/3 cup vegetable oil
1 teaspoon vanilla extract
1 cup milk
1/2 cup coffee or water
4 large eggs
Directions
Preheat the oven to 350°F. Lightly grease and flour your choice of pan(s): one 9" x 13" pan, two 9" round pans, three 8" round pans, or the wells of two muffin tins. You can also line the muffin tins with papers, and spray the insides of the papers.
1. Place a strainer over a large mixing bowl. Measure in the flour, baking powder, baking soda, salt, cocoa, and sugar. Sift/shake the dry ingredients through the strainer into a mixing bowl, to eliminate any lumps.
2. Add the butter and mix at low speed for 1 minutes. With the mixer running, add the oil and continue mixing until the mixture looks like sand.
3. Combine the vanilla with the milk and coffee or water, and add all at once. Mix for 1 minute at low speed, stop and scrape the sides and bottom of the bowl, then mix for 30 seconds more.
4. Add the eggs one at a time, beating well at medium-high speed between additions.
5. Scrape the sides and bottom of the mixing bowl, and mix for 1 minute more. The batter will be thin.
6. Transfer the batter to the prepared pan of your choice. For layers, divide the batter among the pans. Smooth out the tops of the layers with an offset spatula or the back of a tablespoon. For cupcakes, scoop by the heaping 1/4 cup into the prepared muffin tins.
7. Bake for 34 minutes for a 9" x 13" pan; 28 to 30 minutes for 9" layers; 24 to 26 minutes for 8" layers, or 21 to 23 minutes for cupcakes.
8. The cake is done when the top springs back when very lightly touched in the center, and the edges just begin to pull away from the edge of the pan. A toothpick inserted in the center will come out clean.
9. Remove the cake from the oven and place on a rack to cool before removing it from the pan.
Coconut Cream Filling
Ingredients
1/2 cup heavy cream
1/4 cup sugar
1/2 box instant coconut cream pudding
1/8 cup coconut
Directions
Beat heavy cream and sugar with a mixer on medium high speed until mixture thickens. Fold in dry pudding and coconut. Let mixture sit in refrigerator for 20 minutes or until ready to use.
Last evening was my second class in my Wilton 1 course. For class I had to take a cake that was torted, filled, and iced. I also had to take icing for practicing and colored icing for decorating my cake. During class I learned how to make stars, lines, dots, writing and also started building the rose. After practicing those designs for awhile I was able to start decorating my own cake.

I originally wanted to make a cake with red white and blue stars on it that was patriotic but I remembered that my instructor said black and red were the hardest colors to mix. So I just grabbed a couple colors and got to mixing. The end result is what I am calling a shooting star cake. :)

A few things that I learned this week. After making a last minute trip to the store I learned to buy Crisco in bulk, not those easy 1 cup sticks, go ahead and buy the big mongo tub. Afterall it only takes a second to measure. Buy lots of powdered sugar too, you will also need more of this than you think you will. Icing consistency matters, my "medium" was really super stiff and hard to pipe. I learned to just add a bit more water and mix it up well. I also think I need to buy some "butter flavor" I only used vanilla this time and thought it was good but something was missing. My instructor showed me the Wilton 8" x 3" cake pan. It is amazing! If you use a boxed cake it holds an entire box mix and bakes up beautifully (especially if you use the bake-even strips). Last but not least, the Wilton Bake-Easy non-stick spray is my new bestest friend. :)

I have always wanted to take the Wilton cake decorating classes but never had any free weeknights to do it. Now that I am done with school and have a little spare time I decided that a nice graduation present to myself would be to take the classes. Last night was my first session of course 1. In class we learned about the 3 different consistencies of icing, how to properly assemble a pastry bag, how level a cake, how to fill and ice a cake to prepare it for decoration, and also how to color the icing.
After the class the instructor guided the students into the store (Hobby Lobby) to pick out some items that we would need for the rest of the classes. I bought a few things at the store and came home and combined it with the items that I already had. Here are most of the supplies that I have accumulated so far. :)
 Course 1 book, 12 pack of icing colors, Tip# 789, Piping Gel, Flower nail, Clear vanilla flavoring, 8" X 3" round cake pan, Bake Easy non-stick spray, 4 pack of couplers, piping bag ties, cake leveler, 16" featherweight bag, and the 50 piece tool caddy decorator set that is packed full of tips and other necessary items.
I am extremely excited about these courses and I can not wait until next week when I get to start practicing the different design elements and decorate a cake with them. Check back weekly because I plan on posting weekly updates of my decorated cakes and maybe even some new cake recipes.