Showing posts with label Appetizers. Show all posts

Wednesday, May 18, 2011

Guacamole

I remember going to California a few years back and thinking that it was so strange that Subway asked everyone if they wanted avocado on their subs.  I had never even eaten an avocado let alone spread it all over my sandwich.  Turns out that avocados are actually quite delicious and are great spread upon sandwiches, wraps, or layered into a salad.  As seen below, they obviously make an awesome dip for tortilla chips too.  Guacamole and I might just be new best friends!   

Not only are avocados delicious but they are also a superfood!  Yes, they are pretty high in fat, but it is mono saturated fat, the kind of fat that is good for you and heart healthy.  Avocados also pack in a high fiber content and have double the potassium of a banana. 


Garlicky Guacamole
adapted from Rachel Ray


Ingredients

3 ripe small Hass avocados
1/2 to 1 lemon, juiced
2 large cloves garlic, minced
1 roma tomato, seeded and finely chopped
1 teaspoon coarse salt

Directions
Cut avocados in half around the pit. Separate the halves. Pop out pit with spoon, then scoop flesh of avocados into a bowl. Squeeze the lemon juice over the avocados. Add garlic, tomato, and salt to the bowl. Mash and mix the ingredients into a chunky dip using a fork. Serve with corn tortilla chips.

Friday, January 29, 2010

Cucumber Finger Sandwiches

This was yet another appetizer that was served at my friends birthday party a few weekends ago. I was not the one that originally made them but I decided that they were so good that I wanted to make them soon. I went out and bought all the ingredients and then made a few little sandwiches here and there throughout the week for my husband and I.


These are super quick and easy to prepare but are best if assembled shortly before serving. They were definitely a hit at the party and with my husband and would be the perfect addition to any get together where something light and fresh tasting was needed. In case you were wondering, I was able to get this cute shaped bread by baking some bread dough in my scalloped bread tube.


Cucumber Finger Sandwiches
adapted from
Allrecipes

Ingredients
1 (8 ounce) package cream cheese, softened
1/2 cup mayonnaise
1 (.7 ounce) package dry Italian salad dressing mix
2 loaves French bread, cut into 1 inch slices
2 medium cucumbers, sliced
1 pinch dried dill weed

Directions
In a medium bowl, mix together the cream cheese, mayonnaise and Italian dressing mix. Refrigerate for at least 6 hours, or preferably overnight.
Spread the cream cheese mixture onto the slices of French bread. Top with a piece of cucumber and sprinkle with dill.
Note - The cream cheese mixture keeps for a week in the fridge so you can make as many or few as you need at a time.

Wednesday, January 20, 2010

Stuffed Mushrooms

I have always been a fan of the concept of stuffed mushrooms. Big meaty mushrooms stuffed with all kinds of delicious filling and baked until warm. Seriously what is not to love about that idea. The only problem was that up until last weekend I had never actually eaten a stuffed mushroom. Why do you ask, well I happen to hate (with a passion) onion and seafood and I was just sure that every stuffed mushroom I had ever been offered had one or both of those ingredients in it. So to be safe I waited until I could make them myself to truly indulge in their deliciousness. I helped a friend from work prepare some dishes for a birthday party this past weekend and these stuffed mushrooms were one of the first things that I suggested to make.


These mushrooms were an absolute hit! There were about 50 pieces made and they were the first dish to totally disappear at the party. I had a few requests for the recipe and many people telling me how delicious they were. The prep work of cleaning all the mushrooms is a little time consuming but is definitely worth it. I will definitely be making these again and again.

Mouth-Watering Stuffed Mushrooms

from Annie's Eats originally adapted from Allrecipes

Ingredients
24 whole fresh mushrooms
1 tablespoon vegetable oil
1 tablespoon minced garlic
1 (8 oz) package cream cheese, softened
1/4 cup grated Parmesan cheese
1/4 teaspoon ground black pepper
1/4 teaspoon onion powder
1/4 teaspoon ground cayenne pepper

Directions
Preheat the oven to 350° F. Lightly grease a baking sheet with cooking spray. Clean mushrooms with a damp paper towel. Carefully remove the stems from the mushroom caps, setting the caps aside for later. Add the stems to the bowl of a food processor. Add the garlic to the food processor as well, and pulse in brief bursts until them mushroom stems and garlic are finely chopped.

Heat the oil in a large skillet over medium heat. Add the chopped mushroom stems and garlic and cook until all the moisture has disappeared, about 5-7 minutes. Lower the heat to medium-low. Stir in the cream cheese, Parmesan cheese and spices. Stir together until the mixture is smooth and creamy; remove from the heat. Using a small spoon, fill each mushroom cap with a generous amount of filling. Arrange the mushroom caps on the prepared baking sheet. Top with bread crumbs, if desired. Bake for 20 minutes or until the mushrooms are hot and liquid starts to form under the caps. Transfer to a serving platter, garnish with fresh herbs if using and serve immediately.

Monday, January 26, 2009

Potato Slabs

I seemed to have an excess of potatoes sitting around my house and was trying to think of something new to make as a side. This was the first thing that came to mind. These are such a simple and yummy appetizer, or side dish if you prefer.


Many people make these by slicing a potato in half and scooping out some of the insides but I prefer just slicing the potato into slabs. It helps cook the potato evenly and doesn't waste any of the insides. These would be a perfect snack for the upcoming superbowl parties.


Potato Slabs
Source: Amber's Delectable Delights

Ingredients
2 russet potatoes
Salt, to taste
Black pepper, to taste
Paprika, to taste
1/3 cup colby-jack cheese
5 slices of bacon, cooked and diced
Green onions for garnish, if desired
Sour cream, if desired

Directions
1. Preheat oven to 375. Clean and scrub potatoes well. Slice the potatoes into 1/4" thick slices. Place potatoes on lightly buttered baking sheet and season each side with salt, black pepper, and paprika. Cook for 30 minutes. Flip potatoes over and cook for an additional 15 minutes.
2. Remove pan from oven and place a pinch of cheese and bacon on top of each potato slab. Return the pan to the oven and cook until cheese is melted and bubbly, about 10 minutes. Serve with green onions and sour cream, if desired.

Monday, December 29, 2008

Cold Veggie Pizza

Vegetable pizza is a quick and easy appetizer that everyone always seems to enjoy. I took this dish with me to Christmas with my family and they gobbled it up. The great thing about this recipe is that it can be changed up with whatever vegetables you are in the mood for or happen to have in your fridge. I typically just use broccoli, cauliflower, and carrots though.


Everything can be prepped in advance with this recipe, bake the crust the day before, make the cream cheese topping and chop all the vegetables, but it is best assembled the day you are planning to eat it.


Cold Vegetable Pizza
Source: Amber's Delectable Delights

Ingredients
2 (8 oz) packages crescent recipe creations
1 (8 oz) package cream cheese, softened
1 tablespoon mayonnaise
1 clove garlic, minced
1/2 teaspoon dill weed
1 tablespoon dry ranch seasoning
Freshly ground black pepper, to taste
2 cups vegetables, cut into bite size pieces
1 cup shredded cheese

Directions
1. Preheat oven to 375 degrees. Unroll crescent dough sheets onto a large non-sick baking pan to completely cover the pan. Press the your fingers over the dough to seal the seems. Bake 12-15 minutes, or until the top is lightly browned. Set aside to cool.
2. Mix together the cream cheese, mayonnaise, garlic, dill, ranch and black pepper. Set aside.
3. Once the crust is completely cooled, evenly spread the cream cheese mixture over it. Cut the crust into squares and then top with the vegetables and cheese of your choice. Refrigerate until ready to serve.

Tuesday, November 25, 2008

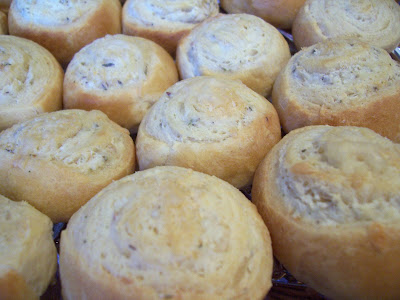
Italian Pinwheels

One of my new favorite products was on sale at the grocery store last week so I picked up a few rolls to experiment. I am sure I have mentioned it before, but I like these crescent recipe creations so much because they are trans fat free while regular Crescent rolls are not. I know they are still not the best treat in the world for you but oh well, as my mother in law says, "nothing flavors like fat."


I had some salami in the fridge that needed to be used up so I figured I would pair it with some cheese and make some pinwheels. Nothing to complicated here. Just a few basic ingredients rolled up into some flaky dough and baked until golden. I think these would be just as great with pepperoni but I really like the taste that the salami gave them. Give them a try for a quick and easy appetizer or snack.

Italian Pinwheels
Source: Amber's Delectable Delights

-makes 12 pinwheels -

Ingredients
1 can (8 ounces) Pillsbury Crescent Recipe creations
1/3 cup mozzarella cheese
1/3 cup Parmesan cheese
6 slices salami, diced
1 teaspoons Italian seasoning
1 egg white, beaten

Directions
1. Heat oven to 350°F. Unroll Crescent dough sheet onto large cutting board.
2. Sprinkle the dough with the mozzarella cheese, Parmesan cheese, salami and herbs.
3. Starting at shortest side, roll up the dough sheet into one large cylinder; pinch edge to seal. Cut roll into 12 slices. Place slices, cut side down, 1 inch apart on ungreased cookie sheet. Gently press down on slices to ensure uniform baking. Brush with beaten egg white.
4. Bake 18 to 20 minutes or until golden brown.

Monday, November 10, 2008

Parmesan Rosemary Pinwheels

I came across this recipe a few years ago when I hosted my first Pampered Chef party at my house. One of the recipes I chose for the consultant to make were these and I am glad I did because they were a hit with everyone. I have made them quite a few times since and they always go over well.


These little bites are the perfect appetizer for any winter gathering like Thanksgiving dinner, Christmas dinner, or potlucks at work. Although these are great served warm I think that they taste just as good when served at room temperature also.

These pinwheels are so quick to make and bake that they would be perfect for something to throw together at the last minute. In fact, I bet they could just as easily be prepped and sliced and frozen in a single layer on a cookie sheet and then just baked at a moments notice. They are just so perfect for the craziness also known as the end of the year and holiday season. Also, do not be scared to get creative with the filling ingredients. Ham, spinach and Swiss cheese sounds pretty tasty as does strawberry with cinnamon and sugar sprinkled on top.


Parmesan Rosemary Pinwheels
Adapted from Pampered Chef, Season's Best, Fall/Winter 2003

Ingredients
1 can (8 ounces) Pillsbury Crescent Recipe Creations
1/2 cup regular cream cheese spread
1/4 cup (1 ounce) grated fresh Parmesan cheese
1 teaspoon Pampered Chef pantry rosemary herb seasoning mix or 4 teaspoons snipped fresh rosemary

Directions
1. Preheat oven to 375°F.
2. Roll out the crescent recipe creations dough.
3. Place cream cheese in small bowl. Add rosemary and Parmesan cheese to bowl and mix well.
4. Spread the entire sheet of dough with the cream cheese mixture, leaving a 1/4 inch border all the way around.
5. Roll up the sheet of dough from one of the long edges; pinch edges to seal.
6. Using a serrated knife cut the rolled up dough into ~22 slices.
7. Place slices, cut side down, on stone or a baking sheet lined with parchment paper and press down lightly to even the tops of each pinwheel out.
8. Bake 12-15 minutes or until golden brown.

Monday, October 27, 2008

Roasted Garlic and Herb Dip

Saturday night was my monthly scrapbooking meet-up. Usually we gather at my mother-in-laws house but I thought it would be fun to host it at my house this month. For my menu I decided on pulled pork sliders on sweet rolls, mac and cheese, and this roasted garlic and herb dip served with fresh vegetable and potato chips.


This dip was pretty easy to make once the garlic had been roasted, that was the most time consuming part of the recipe. I just whirled all the ingredients around in my food processor to make sure everything was chopped and well distributed. I used a combination of fresh and dried herbs since fresh are pretty hard to find locally. I would say that the dip was definitely a hit. It was a nice change from typical ranch that I love so much. I think I will make it again, possibly changing up the herbs to see what different combinations I can come up with.


Roasted Garlic & Herb Dip
Source: Seen on
Good Things Catered originally by Williams Sonoma

Makes about 3 cups.

Ingredients
4 heads garlic
2 tablespoons olive oil
1 fresh rosemary sprig
1 fresh thyme sprig
1 1/2 cups sour cream
6 tablespoons mayonnaise
1 1/2 tablespoons chopped fresh rosemary
1 1/2 tablespoons chopped fresh thyme
3 tablespoons chopped fresh flat-leaf parsley
3/4 teaspoons Worcestershire sauce
2 teaspoons fresh lemon juice
1 1/2 teaspoons kosher salt
Freshly ground pepper, to taste
Potato and/or fresh veggies for serving

Directions
Preheat an oven to 400°F.

Cut off the tops of the garlic heads and rub the cut surface with the olive oil. Put the garlic in a garlic roaster or on a baking sheet. Arrange the rosemary and thyme sprigs on or around the garlic. Cover the garlic roaster with the lid or the baking sheet with aluminum foil. Roast until the garlic cloves are soft and lightly browned, about 1 1/4 hours. Let cool completely.

Squeeze the pulp from the garlic cloves into the container of an immersion blender or into a deep bowl. Add the sour cream, mayonnaise, chopped rosemary, thyme and parsley, the Worcestershire sauce, lemon juice, salt and pepper. Using an immersion blender, blend until well combined. Cover the dip with plastic wrap and refrigerate for at least 30 minutes.

Serve the dip with potato chips.

Wednesday, October 8, 2008

Chicken Club Squares

A couple weeks ago I was sent some promotional products from Pillsbury. Along with some other products inside my box was 2 rolls of their new crescent roll product called crescent recipe creations. I decided to throw together some things that were in my kitchen and came up with these Chicken Club Squares. Instead of having a club sandwich for your lunch or dinner you can now switch it up a bit and have the sandwich for an appetizer with these bars.


Although I did not make mine with tomatoes I added them into the ingredients of the recipe because I feel it would compliment the rest of the ingredients and it would also add some nice color. See my beautifully seasoned Pampered Chef stone? Isn't she beautiful. Her and her brothers and sisters are my bestest friends. ;) I <3>

My recipe testers all gave these 2 thumbs up. In fact, they liked them so much that they finished off the entire tray. But that was ok with me because they would have gone bad in the fridge overnight. They really are best if they are eaten within a few hours of being assembled. Wait, lets rewind a moment, I fibbed a teeny bit, my sister left the last one for my husband but he so graciously let me have it. What a man, what a man. :)


I came back because I forgot to mention the best thing about these new crescent recipe creations. They are trans fat free!! The same thing can not be said for the regular crescent rolls.

Chicken Club Squares
Source: Amber's Delectable Delights

Makes 15 squares

Ingredients
1 can Pillsbury Recipe Creations, crescent rolls
1 block (8 ounces) cream cheese, softened
1 tablespoon mayonnaise
2 small or 1 large clove garlic, minced
1 teaspoon dried dill
black pepper, to taste

1 cup chicken, cooked shredded and cooled
4 slices bacon, cooked crumbled and cooled
1 cup shredded cheese
1 roma tomato, seeded and chopped (optional)
1 cup lettuce, chopped

Directions
1. Preheat oven to 375 degrees. Roll crescent sheet onto baking pan and roll out slightly with a rolling pin to flatten. Bake 12-15 minutes, or until the top is lightly browned. Set aside to cool.
2. Mix together the cream cheese, mayonnaise, garlic, dill and black pepper. Set aside.
3. Once the crust has completely cooled top with cream cheese mixture. Cut into squares and then top with the chicken, bacon, cheese, tomato(if desired) and lettuce.

Sunday, July 6, 2008

Creamy Cheese Spread

I had a few blocks of cheese in the fridge that I wanted to use up but didn't quite know what to do with them. I decided I would make some kind of a cheese ball or spread since it had been a while since I last had it. Seriously though, who doesn't love a big creamy ball of cheese that tastes awesome by itself but even better spread on crackers. I know I do!


I had no game plan when it came to putting this together, but whatever I did must have worked because this tasted wonderful. My husband, who would rather eat things plain than dip them in something, said about 10 times in a matter of hours how much he loved this spread. My guests and I enjoyed it too. It was so easy to throw together that this might be something I experiment with and make often.


Three-Cheese Spread
Source: Amber's Delectable Delights


Ingredients
8 oz. block sharp cheddar cheese
4 oz. block pepper jack cheese
8 oz. cream cheese
1 clove garlic
1 teaspoon parsley
1 teaspoon onion powder
Dash of Tabasco
Dash of Worcestershire sauce
Salt and pepper to taste

Directions
1. In a food processor fitted with the shredding disk, shred cheddar and pepper jack cheese. Empty the cheese from the workbowl and place the metal blade into the bottom of the bowl.
2. Add the cream cheese, garlic and remaining seasonings into the workbowl and process for one minute. Add in the shredded cheese and process for 1-2 minutes or until everything is well mixed and creamy.
3. Store in refrigerator until ready to serve. Serve with crackers and/or pretzels.

Tuesday, March 11, 2008

Crunchy Little Devils

I was wondering around aimlessly on the Internet searching for something to make for dinner when I came upon this recipe. It was the featured "dinner tonight" recipe on Cooking Light and as soon as I saw the picture for these crispy little strips I got excited. I opened the recipe and saw that it was for catfish. What a bummer! I don't care for fish but no fear chicken will save the day.

I only used about 3 tbls of the hot sauce mixture but that is what is so great about the recipe, you can use as much or as little as you like, or none at all if you so desire. The only thing left to say is that these crunchy little devils were amazingly good!!


Buffalo-Style Chicken Strips with Ranch Dressing
(Adapted from: CookingLight.com)

Ingredients
2 tablespoons all-purpose flour
1 teaspoon garlic powder
1 teaspoon paprika
1/2 teaspoon onion powder
1/2 teaspoon salt
1/8 teaspoon ground red pepper
2 large egg whites, lightly beaten
1 1/2 cups coarsely crushed cornflakes
1 pound chicken breasts, cut into 1/2-inch-thick strips
Cooking spray
1/3 cup hot sauce (such as Crystal)
1 teaspoon hot pepper sauce (such as Tabasco)
1/2 teaspoon Worcestershire sauce
1 tablespoon butter
1/2 cup fat-free ranch dressing
4 celery stalks, cut into 1/4 x 3-inch sticks
4 carrots, cut into 1/4 x 3-inch sticks

Directions
Preheat oven to 400°.
Combine first 6 ingredients in a shallow dish, stirring with a whisk. Place egg whites in a shallow dish. Place cornflakes in a shallow dish. Working with 1 chicken strip at a time, dredge in flour mixture. Dip in egg whites; dredge in cornflakes. Place on a baking sheet coated with cooking spray. Repeat procedure with remaining chicken strips, flour mixture, egg whites, and cornflakes.

Lightly coat chicken strips with cooking spray. Bake at 400° for 10 minutes or until done, turning once.

Combine hot sauce, pepper sauce, and Worcestershire in a small saucepan; bring to a boil. Reduce heat, and simmer 1 minute. Remove from heat; stir in butter. Drizzle hot sauce mixture over chicken. Serve with ranch dressing, celery, and carrots.

Tuesday, December 25, 2007

Mini Mac

After browsing through my google reader looking for something to make to take to my aunt's house for Christmas , I came across these cute little mini macaroni and cheese bites. I thought that they were pretty cute and decided that they would be perfect. The only bad thing is that they do not stay warm for long at all so it is best to eat them as soon as they come out of the oven.

These were very easy to make and took minimal time. I did substitute Colby for the American cheese and I think next time I would choose 2 different cheeses entirely, just for a different taste.


Mini Mac and Cheese
(Source: Food&Wine via KaylaCookies)

Yield: 48 pieces

Ingredients
1/2 pound elbow macaroni
1 1/2 tablespoons unsalted butter, plus more for brushing
1/4 cup freshly grated Parmigiano-Reggiano cheese
2 tablespoons all-purpose flour
3/4 cup milk
4 ounces cheddar cheese, shredded (1 packed cup)
4 ounces deli-sliced American cheese, chopped
1 large egg yolk
1/4 teaspoon smoked Spanish paprika

Directions
- Preheat the oven to 425°
- In a large saucepan of boiling salted water, cook the macaroni until al dente, about 5 minutes. Drain, shaking off the excess water.
- Brush four 12-cup, nonstick mini muffin tins with butter. Sprinkle with 2 tablespoons of the Parmigianino; tap out the excess.
- In a large saucepan, melt the 1 1/2 tablespoons of butter. Whisk in the flour over moderate heat for 2 minutes. Whisk in the milk and cook, whisking, until boiling, about 5 minutes. Add the cheddar and American cheeses and whisk until melted. Off the heat, whisk in the egg yolk and paprika. Fold in the macaroni.
- Spoon slightly rounded tablespoons of the macaroni into the prepared muffin cups, packing them gently. Sprinkle the remaining 2 tablespoons of Parmigianino on top.
- Bake the mini macs in the upper and middle thirds of the oven for about 10 minutes, until golden and sizzling. Let cool for 5 min­utes. Using a small spoon, carefully loosen the mini macs, transfer to a platter and serve.

Saturday, September 1, 2007

Craving satisfied

I tried these squares for the first time a few years ago at a Pampered Chef party that I attended. I enjoyed them so much that I made them a few days later at home. Ever since then I get a craving for these squares a couple times a year. Today I decided that I needed to finally satisfy my craving. I omitted the tomatoes and onion but everything else is done per the recipe.

The recipe can be easily cut in half, which is what I did today. I ate 4 pieces of it for lunch and I would not be surprised if the rest of it was gone by the end of the day. :)


Seven Layer Salad Squares
(Adapted from: Pampered Chef, Seasons Best, Spring/Summer 03)

Ingredients
2 (8 oz) pkgs refrigerated crescent dinner rolls
8 oz cream cheese, softened
1/2 cup miracle whip
1 clove garlic, minced
6 slices bacon, crisply cooked, drained and crumbled divided
1 cup frozen peas, thawed, divided

3 plum tomatoes, sliced
2 cups thinly sliced lettuce
1/2 cup shredded cheddar cheese
1/2 cup coarsely chopped red onion

Directions
1) Preheat oven to 375° F.
2) Unroll one pkg dough across one end of a bar pan with longest sides of dough across width of pan.
3) Repeat with remaining package of dough to fill the pan.
4) Using rolling pin or your fingers seal seams and press up sides to form crust.
5) Bake 12-15 min until golden brown. Remove from oven to cooling rack, cool completely.
7) Mix cream cheese, miracle whip and garlic until smooth.
8) Add half the bacon and half the peas and mix well.
9) Evenly spread cream cheese mixture over cooled crust.
10) Arrange sliced tomatoes over cream cheese mixture.
11) Sprinkle remaining bacon, remaining peas, lettuce, cheddar cheese and onion over tomatoes.
12) Cut into squares and serve.


Tuesday, July 10, 2007

Kick it up with Cajun flava

I came across a recipe for cajun chicken strips a while ago, I used that as inspiration for tonight's dinner. The chicken was not really spicy, just really flavorful.


Cajun Chicken Strips
(Source: Amber's Delectable Delights)

Ingredients:
3 Tbls AP flour
1 1/2 tsp cajun seasoning
1 tsp poultry seasoning
3/4 tsp garlic salt
1/2 tsp paprika
3-4 boneless skinless chicken breasts, cut into strips

Directions:
1) Preheat oven to 350
2) Combine flour, cajun seasoning mix, poultry seasoning, garlic salt and paprika in a large resealable bag and shake to mix
3) Add chicken, in batches, to flour mixture and shake to coat
4) Spray cooking sheet with nonstick spray and place coated chicken strips onto sheet.
5) Bake at 350 degrees for 20-25 minutes or until done.
----- ---- ----- ---- ----- ---- ----- ---- ----- ---- -----

The green bean fries were tasty. I thought they needed a bit more something but my husband really liked them. So I just dipped them in ranch and called them great. :) I have never had the actual green bean fries from whatever chain restaurant it is that makes them, so I do not really have anyting to compare them to.


Green Bean Fries
(Source: Amber's Delectable Delights)
Ingredients:
2-3 handfuls of green beans (cleaned and trimmed)
1 egg
1/2 cup milk
1/2 cup flour
3/4 cup breadcrumbs
1/4 tsp salt
1/2 tsp garlic powder
1/2 tsp cajun seasoning
Vegetable or Canola oil for frying
Directions:
1) Boil green beans in water or broth for 10-15 minutes or until they are to your desired tenderness. Then place in cold water to stop the cooking process
2) Beat egg and milk together in a shallow bowl
3) Place the flour into another shallow bowl
4) Combine breadcrumbs and seasonings into a 3rd shallow bowl
5) Take a few beans at a time from the cold water (shake off excess water) and coat them in the flour, then into the milk/egg mixture, then the breadcrumb mixture
6) Place all the beans to the side on a plate until you have them all coated
7) Heat the oil to 350 degrees and fry the beans (a few at a time) until golden brown, about 1 minute. Drain beans onto paper towels. Sprinkle with salt if desired and serve.

Monday, May 28, 2007

Stuffing the berry

I have had my eyes on this recipe for over a year now. Thank goodness I was finally able to make it. They were yummy and everyone loved them.


Stuffed Strawberries
(Source: allrecipes.com)

Ingredients
1 pint fresh strawberries
1 (8 ounce) package cream cheese, softened
1/2 cup confectioners' sugar, or to taste
2 tablespoons orange flavored liqueur, or to taste

Directions
Cut the tops off of the strawberries and stand upright on the cut side. Make a cut 3/4 of the way down from the tip of the strawberry towards the bottom.
Beat together the cream cheese, sugar, and liqueur until smooth in a mixer or a food processor. Place into a piping bag with a star tip. Pipe into each strawberry and arrange on a serving platter.

My Modifications
* I used vanilla extract instead of the orange liqueur
* I made 2 slices in the berries instead of one so there would be 4 pieces instead of 2.

Three cheese, no sauce.

For our little Memorial Day party I decided to finally make a Rachel Ray recipe I had been eyeing for months. It is a Garlic and Herb Three Cheese Pizza. I could not find all the Boursin cheese so I just took my own spin on it.

I was pleasantly surprised at how yummy this was. I was curious about the ricotta cheese on the pizza. But it was awesome and I will definitely be making it again. It is great straight from the oven or even at room temperature.


Garlic and Herb Three Cheese Pizza
(Source: Rachel Ray)

1 ball fresh pizza dough, store bought or from your favorite pizzeria
2 cloves garlic, finely chopped
Handful parsley leaves, finely chopped
1 cup ricotta cheese
1 (5-ounce) round soft cheese with herbs, crumbled (recommended: Boursin)
1 teaspoon lemon zest, eyeball it
2 cups shredded sharp provolone cheese
Few sprigs fresh thyme, leaves chopped or 1/2 teaspoon dried

Preheat oven to 425 degrees F.
Stretch dough out and form a thin round. Use a little flour or cornmeal on your hands if dough sticks. Mix the garlic, parsley, ricotta, herb cheese and lemon zest. Spread the soft cheese mixture across the pizza dough to the edges then top with an even layer of provolone. Scatter thyme over the cheese mixture. Bake until crisp and bubbly-brown on top, 18 to 20 minutes.

My modifications:
* I could not find the Boursin cheese so I used mozzarella and Parmesan instead.
* I omitted the lemon zest because I did not have any lemons.
* My crust was more thick than it was thin, so I prebaked it before adding the toppings to the pizza to ensure a crispy crust.
* The is great straight from the oven or at room temperature.

Friday, May 25, 2007

Sweet lil what?

Yesterday Cassi (my sister) asked me for recipes of things to make for her work carry-in. After naming off tons of different things she finally said that something sounded good. So I e-mailed her the recipe and told her that if she took a picture I would post it in my blog. So here it is.


Sweet Lil’ Smokies
(From a nestie; sorry can not remember who)

1 Package of Lil' Smokies
2 tubes of Croissant dough
1 cup butter
1 cup chopped walnuts (used almonds instead)
6 T Brown sugar
1 T honey

Melt butter, and add nuts, sugar, and honey. Pour into a baking dish. Roll the Smokies in the dough (about 48 total) and place on top of butter mixture. Bake 375 for 25 minutes.

Sunday, May 6, 2007

Just a little snack

I was first introduced to pepperoni and cheese bread a few years ago when my sister brought some home from a holiday party. I enjoyed it so much I started making it. My friend Chelley made some last week, it inspired me to make some soon, so I did.

I had fun taking pictures of this. So you get to see lots of different pictures because I can not decide which I liked the best. :) Drool away........


Pepperoni and Cheese bread
(Source: Amber's Delectable Delights )

Ingredients:
1 roll refrigerated french bread dough OR 1 loaf frozen bread dough (thawed)
Pepperoni (I used turkey pepperoni for a healthier option).
Mozzarella cheese
Parmesan cheese
Egg wash (1 egg white, water)

Directions:
1. Preheat oven to 350.
2.
Roll out bread dough and sprinkle with mozzerella and parmesean cheeses, place pepperoni (as much as desired) on top of the cheese.
3.
Carefully roll the bread dough into a cylinder shape. Pinch ends and top to seal. Brush top and sides of loaf with egg wash. If desired, top loaf with cheese, pepperoni, and/or Italian seasoning. Make a few diagonal slices in top of loaf for air to escape while cooking.
4.
Bake at 350 for ~20 min. Remove from oven and let cool for 5 minutes before slicing.

ENJOY!!