

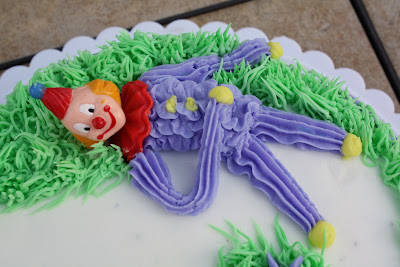
My instructor tells me I am doing great job and she thinks that I am way to much of a perfectionist. The top of the cake was iced white and the sides were iced in purple. There is a white shell border on the bottom and two lazy (possibly drunk) clowns surrounded by grass with a few drop flowers on top.

Next week is the final class of Course 1. I will learn how to finish making the rose and will also learn a couple new flowers. I am excited to end this course so I can start the second one!
I used new recipes this week so I will share them with you here. I found a recipe for Chocolate Cake on KAF's (King Arthur Flour) website and filled it with coconut cream. The people at my husbands work devoured this cake and said it tasted much better than last week's
Chocolate Cake
Adapted from King Arthur Flour
Ingredients
2 1/4 cups King Arthur Unbleached All-Purpose Flour
1 1/2 teaspoons baking powder
1/2 teaspoon baking soda
1/2 teaspoon salt
3/4 cup unsweetened cocoa
1 3/4 cups granulated sugar
1/2 cup (1 stick) unsalted butter, very soft
1/3 cup vegetable oil
1 teaspoon vanilla extract
1 cup milk
1/2 cup coffee or water
4 large eggs
Directions
Preheat the oven to 350°F. Lightly grease and flour your choice of pan(s): one 9" x 13" pan, two 9" round pans, three 8" round pans, or the wells of two muffin tins. You can also line the muffin tins with papers, and spray the insides of the papers.
1. Place a strainer over a large mixing bowl. Measure in the flour, baking powder, baking soda, salt, cocoa, and sugar. Sift/shake the dry ingredients through the strainer into a mixing bowl, to eliminate any lumps.
2. Add the butter and mix at low speed for 1 minutes. With the mixer running, add the oil and continue mixing until the mixture looks like sand.
3. Combine the vanilla with the milk and coffee or water, and add all at once. Mix for 1 minute at low speed, stop and scrape the sides and bottom of the bowl, then mix for 30 seconds more.
4. Add the eggs one at a time, beating well at medium-high speed between additions.
5. Scrape the sides and bottom of the mixing bowl, and mix for 1 minute more. The batter will be thin.
6. Transfer the batter to the prepared pan of your choice. For layers, divide the batter among the pans. Smooth out the tops of the layers with an offset spatula or the back of a tablespoon. For cupcakes, scoop by the heaping 1/4 cup into the prepared muffin tins.
7. Bake for 34 minutes for a 9" x 13" pan; 28 to 30 minutes for 9" layers; 24 to 26 minutes for 8" layers, or 21 to 23 minutes for cupcakes.
8. The cake is done when the top springs back when very lightly touched in the center, and the edges just begin to pull away from the edge of the pan. A toothpick inserted in the center will come out clean.
9. Remove the cake from the oven and place on a rack to cool before removing it from the pan.
Coconut Cream Filling
Ingredients
1/2 cup heavy cream
1/4 cup sugar
1/2 box instant coconut cream pudding
1/8 cup coconut
Directions
Beat heavy cream and sugar with a mixer on medium high speed until mixture thickens. Fold in dry pudding and coconut. Let mixture sit in refrigerator for 20 minutes or until ready to use.


11 comments:
Your cake looks fabulous! I love your creativity- the clown lying in the grass is so cute!
I would have to agree, the clowns look drunk!
JUST KIDDING! I think you did I good job, can you imagine what they would look like if I did them?
Your cake looks so amazingly cute!!! LOVE the lazy clowns on the grass...such ingenuity!! I took course 1 in March with my friend Sarah and we are waiting for things to slow down to sign up for course 2 & 3...so exciting!! Good luck to you.
I love your cake! You are doing such a fabulous job. Can't wait to see your final cake!
Good job!! You are going to be a perfectionist. Your bottom border is great!
I'm glad this week is over - clown cakes scare the beejeebus out of me.
I make my clown cake tomorrow. We wre allowed to make cupcakes so I did. I am going to use this chocolate cake recipe. Your cake loook great no matter what you think. You did a great job.
Your teacher is right you are a perfectionist because I see a great job done. :)
Susie
Oh, how fun! These are so cute!
Adorable clowns! I just did my clown cake and couldn't help but think of all the creepiness associated with smiling plastic clown heads in a bag.
Can't wait to make the final cake!
lovely cake, I am very impressed!
Post a Comment